How to Balance a Ceiling Fan
Last updated September 7, 2023
Learning how to fix a wobbly ceiling fan is a small repair project that can head off what could become a safety risk. While a small wiggle in ceiling fans up to 1/8-inch is normal, more than that can indicate a larger problem. A noisy, off balance ceiling fan can lead to inefficient operation and excessive wear on the fan motor.
Although learning how to balance a ceiling fan is simple, it's a fix that will preserve your fan for years to come.
Ultimately, parts of the fan could detach and fall off, or the fan itself could fall. Use this guide to learn how to fix a wobbly ceiling fan and how to look for loose fasteners, bolts and nails.
Difficulty:
Intermediate
Duration:
Under 2 hours
Table of Contents
Clean the Ceiling Fan
Check the Ceiling Fan Structure
Check for Loose Fasteners
Examine the Ceiling Fan Blades
Check the Blade Arms
Use a Fan Balancing Kit
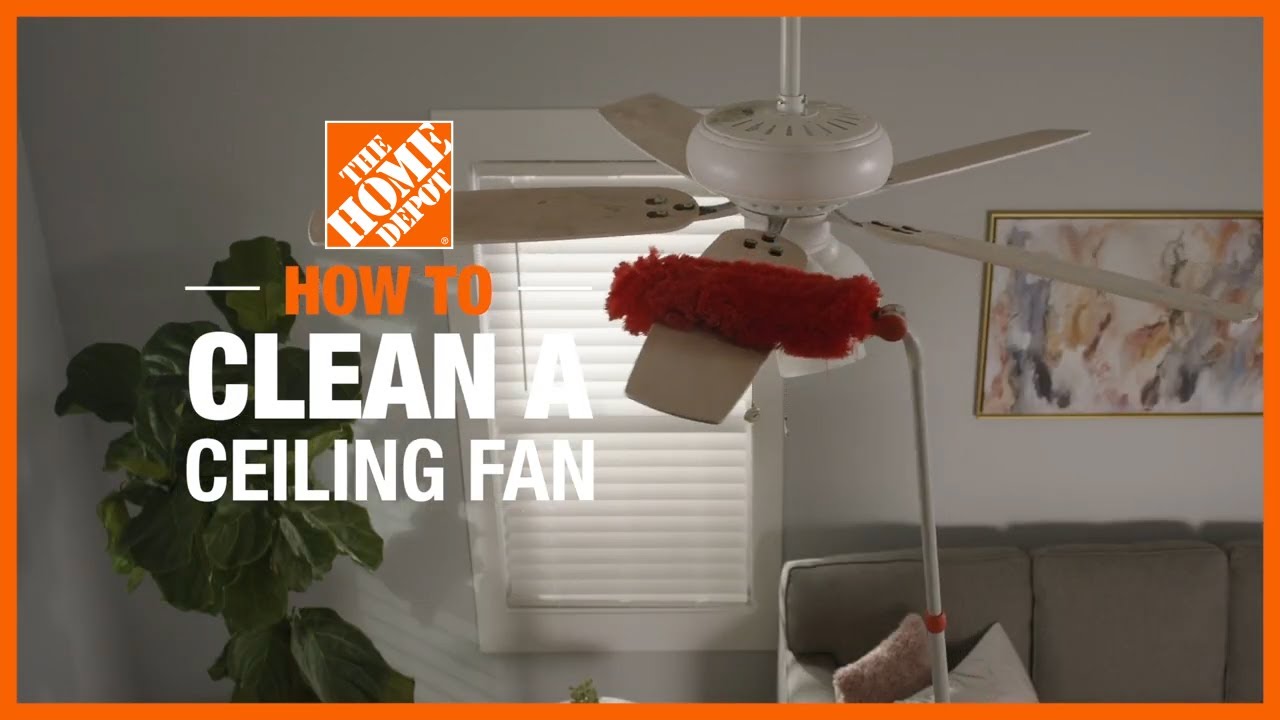
Clean the Ceiling Fan

This project is not overly complicated but learning how to balance a ceiling fan will require some patient troubleshooting, as there could be several reasons for the problem. This guide will help you walk through the basic checks.
Dust builds up on ceiling fans over time and can clog the fan motor in addition to putting pressure on the ceiling fan blades. Either of these problems can contribute to a wobbly ceiling fan, but regular cleaning can help.
- Turn off the ceiling fan and wait for it to come to a complete stop.
- Position a ladder under the ceiling fan slightly off center and climb up to reach the first blade.
- Use a duster to brush dust off the top and bottom surface of the fan blades.
- Lightly dampen a microfiber cloth with warm water and use it to clean the motor housing and wipe the blade surfaces.
- Use a cotton swab to clean the crevices of the ceiling fan arms.
- Make sure to clean blades and housing to better access ceiling fan parts.
- Dry all surfaces thoroughly with a fresh microfiber cloth.
- Turn on the fan and run it at medium and then high speed to see if the problem is resolved.
Tip: Spin the fan in its normal direction of rotation as you work on the blades. This small action helps when you balance a ceiling fan.
Check the Ceiling Fan Structure

The overall support of the ceiling fan should be the first thing to check when looking for a structural cause of wobble.
To be stable, a ceiling fan has to be installed on the correct ceiling mount: either on a fan-rated electrical box mounted to an adjustable fan brace or to a 2' x 4 foot cross beam with lag screws. Check fan blades by measuring space between blade and ceiling to ensure that it is no more than 8 to 10 inches. This will ensure the ceiling fan blades arms are secure and properly installed. An electrical box that is designed for light fixtures only and cannot support the added weight of the fan as it will eventually loosen. The wobble you see may be a precursor to the fan giving way and crashing down.
You can usually loosen the bracket housing to see how the fan is attached from the underside. You should be able to read the label on the electrical box and see the heads of the hex bolts attached to a wood or metal brace. Wiggle the bracket and tighten it up if it wiggles.
Check for Loose Fasteners

Next, begin to look for loose fasteners in the other parts of the fan.
- Examine the hanger ball and be sure it is firmly seated in its groove.
- Tighten the downrod support screws.
- Replace the canopy cover and firmly tighten the screws.
- Turn on the fan and see if the wobble has stabilized.
Turn on the fan and see if the wobble has stabilized.
Examine the Ceiling Fan Blades

- Use a tape measure to measure the vertical distance from the ceiling to the tip of each ceiling fan blade.
- If all of the measurements are not the same, adjust the blades that are off by tightening the mounting screws that hold them to the motor housing.
Tip: All ceiling fan parts plays an integral role in how the fan performs, so don't skip this step.
Check the Blade Arms

Over time, celiling fan blades can began to drop slightly, epecially if the fan is installed is installed in an area with high humidity or subject to temperature fluxations. This can be a large factor in the fan's instability and contribute to celiling fan noise.
- Examine each of the fan blades to be sure they are not warped.
- Replace any blade that appears damaged. For convenience, replace or upgrade ceiling fan arms when you replace the blades.
When selecting new ceiling fan blades, be sure that they are compatible with your fan type and model number so that they are of similar length, width and weight as your old blades.
Blades that are too heavy will strain the fan motor and wear out the fan quicker. Blades that are too short or too light will not move the air effectively.
Most ceiling fans have a replacement parts list available as a PDF that will direct you to the correct replacement blades. Check the fan's product information page on The Home Depot website under the Info & Guides section. You can identify the model of your ceiling fan by referring to its user manual. If the manual is not available, check the top of the ceiling fan motor housing for a label containing the information.
Use a Fan Balancing Kit

Ceiling fan balancing kits are usually packed in with a new ceiling fan, but they can also be purchased separately. Kits come with a plastic clip and up to five small weights, often with an adhesive backing to make them easy to attach to the fan blades.
Using a ceiling fan balancing kit can make the entire process easier.
- Attach the plastic clip from the kit to one blade about halfway up its length, then turn on the fan to see if the instability has improved.
- Turn the fan off.
- Repeat for each blade until you’ve located the problem.
- After you find the problem blade, slide the clip along the blade toward the end about an inch at a time and recheck for improvement after each adjustment.
- Once you find the position that offers the most stability, position one of the balance weights in the center of the fan blade, parallel to the clip.
- Stick or glue the weight in position, then remove the clip.
Replace the Ceiling Fan

If your ceiling fan is over 10 years old, it may have started developing mechanical issues. If your fan gets heavy usage, these issues may come up even sooner. Beyond the wobble, there are other signs to look out for that may indicate that, rather than learning how to fix a wobbly ceiling fan, it’s time to accept that your ceiling fan is ready to be retired:
- Fan is slowing down.
- Buzzing sounds coming from the motor.
- Squeaks that persist even after proper fan maintenance.
If problems persist, you may want to have the fan professionally serviced. If your fan is older, it may simply be time to replace it. See our guide, How to Install a Ceiling Fan, for tips on successfully replacing your old ceiling fan with a new model.
Ceiling Fan Upgrades

Whether you opt for a ceiling fan with lights or a ceiling fan without lights, an upgrade is the perfect solution for how to fix a wobbly ceiling fan. Indoor and outdoor models are available, as well as ceiling fans with remote controls, smart hubs and smart remote controls.
Learning how to balance a ceiling fan can relieve you of noise issues and help the fan motor. Need tools and materials for balancing ceiling fan? Shop us online for the latest ceiling fans and light fixtures. The Home Depot delivers
online orders
when and where you need them.