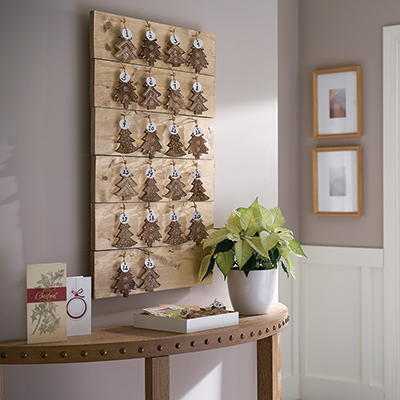
How to Build a Christmas Countdown Calendar

Last updated September 7, 2023
Presented by Jen Woodhouse of House of Wood.
Get ready for Christmas with this delightful project the whole family can help with. With just a few tools, you can create a Christmas countdown calendar and have some fun while you anticipate the big day.
Difficulty:
Beginner
Duration:
2-4 hours
Table of Contents
Gather Tools & Materials
Map Out the Board Text
Paint or Engrave the Text
Add Nails
Create a Wreath
Frame the Calendar
Gather Tools & Materials

You can build this calendar to any size you wish depending on the materials you have available.
Tools:
- Tape measure
- Pencil
- Saw – this can be as simple as a miter box with a handsaw, or as fancy as a compound miter saw
- Dremel Stylo+ or other engraving tool (if you want to engrave your calendar)
- Stencils
- Hammer
- Paintbrush
Materials:
- Scrap piece of plywood
- 1x2 boards
- Paint
- Wood stain
- Gloves
- Rags
- Stencils
- Pipe cleaners
- Nails
- D-ring picture hanger
- Wood glue
- Sandpaper
- Clear, protective top coat
Map Out the Board Text

- Using a stencil, map out the Christmas Countdown heading at the top of the board.
- Trace the numbers for the days underneath the heading. Start with 25 and count down to 1.
- You can do this step freehand if you are able.
Tip: Be sure to use a pencil to make it easy to erase.
Paint or Engrave the Text

- To engrave, use the Dremel Stylo+ or other engraving tool to carve the outline into the wood.
- Once you’ve finished, lightly sand the wood with a fine-grit sanding block to make the surface smooth.
- Next, take a small paintbrush and some acrylic paint and paint in the letters and numbers.
- If you paint outside the lines, simply sand off the mistakes afterwards.
- If you prefer, you can skip engraving and simply paint on the letters and numbers with acrylic paint. Use a thin, pointed brush to outline and then fill in with a slightly larger brush.
- Allow the paint time to dry.
Add Nails

Once the text is done, hammer a small nail over each number – this will be where the wreath will hang from.
Create a Wreath

- To make the wreath, twist some green and white pipe cleaners together into a circle.
- Attach a red pipe cleaner for the festive bow.
Frame the Calendar

Next, frame the calendar with some 1 x 2 boards.
- Measure the length and width of the plywood calendar.
- Cut the 1 x 2's down to the correct size, mitering the ends at 45 degrees. You can use a miter box with a handsaw or a compound miter saw for this.
- Apply wood stain to the 1 x 2's with a rag or old t-shirt. Rub the stain on the wood and wipe off the excess with the same rag.
- Once the stain is dry, glue and nail the frame to the plywood
- Apply wood glue to the edges and ends, then secure it with 1 1/4-inch brad nails using a hammer or a cordless brad nailer, if you have one.
Safety Tip: If you are using power tools, don’t forget to wear protective eyewear and ear protection.
Attach the Hanger

Flip the calendar over and use a cordless drill or screwdriver to attach a D-ring hanger to the back.
Add a Protective Coat

- Add a protective top coat with spray-on sealer.
- Spray a few coats on in a well-ventilated area and allow it to dry.
Count Down to Christmas!

Pick out a fun spot to display your calendar and let your kids count down to the big day. Each night, move the wreath to the next day. If you want, you can make it a fun nightly tradition and celebrate with a holiday song, a story, a game or other fun family activity.
Ready to start your project and countdown to Christmas? Shop online and get everything you need. The Home Depot delivers online orders when and where you need them.