Table of Contents
Select Lumber
Dig the Holes
Cut & Attach Crossbeams
Secure Posts
Attach Rafters and Lattice
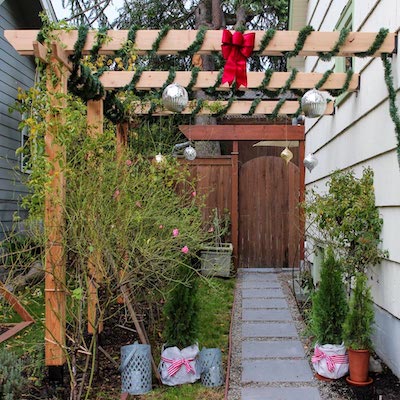


How to Build a Garden Arbor

Last updated September 7, 2023
Read on for step-by-step directions, including what kind of post holes you need to dig.
Difficulty:
Intermediate
Duration:
Over 1 day
Select Lumber

Choosing the right lumber for a garden arbor is the first step toward a successful build. Rough-sawn cedar has natural resistance to the elements which makes it a great choice. A more budget-friendly option is ground contact pressure-treated lumber. It holds up to the weather, repels water and resists rot. Pressure-treated lumber can also be painted or stained.
You’ll need the following for this project:
- Crossbeam supports: Four 4- x 4-inch x 10-foot posts
- Crossbeams:
Two 2- x 6-inch x 6-foot boards - Rafters: Seven pre-cut 2- x 2- x 42-inch deck balusters
- Sides: One 4- x 8-foot section of garden lattice
- Temporary Braces: 2- x 4-inch boards
- Corners: Four 8-foot boards
- Stretchers Between Posts: Two 8-foot boards
Dig the Holes

Choose a flat, relatively level location for your DIY garden arbor.
- Space the front and rear posts of the DIY garden arbor 24 inches apart.
- Mark locations for each hole with spray paint.
- Use a post-hole digger to make holes 30 inches deep for each of the four posts. Make each hole 10 inches wide. This will provide sufficient space for the concrete to expand and anchor the arbor.
Cut & Attach Crossbeams

You can give your crossbeams an ornate or classic style. The ends can be cut square at length, at a gentle angle or with a curve before a flat tip. Just make sure the length from end to end is 72 inches.
- Position two posts on the ground 42 inches apart.
- Place a crossbeam on top of them. Make sure the end is flush with the top edge.
- Place pre-cut 42-inch balusters between the posts. This will help maintain an even distance at the top and bottom.
- Center the crossbeam so that 11 1/2 inches extends beyond the outside edge of each post.
- Drive one 3-inch deck screw through the crossbeam into the left post. Make sure the pieces are square.
- Secure the top rail with the left post with two more screws to secure the top rail to the left post.
- Use the above method to attach the right side of the crossbeam to the right post.
Repeat the process to attach a crossbeam to the second pair of posts.
Tip: Consider getting help with this step in the project to make assembly easier.
Secure Posts

On each post, attach a temporary 2- x 4-inch board 30 inches from its bottom. These are temporary stretchers. They will help stabilize the structure and keep it square during this next step.
- With a helper, level and plumb the first set of posts into their holes.
- Use stakes and 2- x 4-inch boards to brace the posts in the correct position.
- Insert the second pair of posts into the holes. Ensure that the second pair of posts are level and plumb. You also need to check for alignment with the first pair of posts. Use temporary stretchers to help with alignment.
- Once the posts are plumb and braced, prepare the cement mix according to the manufacturer’s directions.
- Fill the holes with the cement mix. Carefully remove any air pockets and don’t knock the arbors out of alignment.
Tip: Make sure the concrete is fully cured and dry before moving to the next step.
Attach Rafters and Lattice

Finish this DIY garden arbor by building the rafters:
- Measure and mark each 42-inch baluster 5 3/4 inches from the end.
- Measure each crossbeam and mark locations for rafters at 9-inch intervals.
- Place a baluster on a crossbeam. Center and position the baluster so that 5 3/4 inches of it extends beyond the crossbeams.
- Fasten the balusters to each crossbeam with a 3-inch deck screw.
- Repeat the process for the remaining rafters.
Add lattice:
- Lattice provides a place for vines to cling to as well as decoration.
- Cut 4- x 8-foot section of garden lattice in half.
- Use 3-inch deck screws to attach a half to each side.
Knowing how to build a garden arbor will help add more style to your outdoor spaces. Using a classic design, you can add personal touches that will make your garden arbor unique. Make sure to choose a weather-resistant wood that stands up to the elements. Building a garden arbor can be easier with help. Time to start building your very own garden arbor? Use The Home Depot Mobile App to locate products and check inventory. We'll take you to the exact aisle and bay.
Explore More on homedepot.com
Furniture
Hardware
Kitchen
- Best Rated Drop-In Kitchen Sinks
- Shop Earthenware Serving Bowls
- LR Home Bordered 16 in. W x 80 in. L Striped Blue / Cream Cotton Table Runner 8289A5084D9348
- Glacier Bay 33 in. Undermount Double Bowl 18 Gauge Gunmetal Black Stainless Steel Workstation Kitchen Sink with Spring Neck Faucet ACS3319A2
- Cooks Standard Sauce Pans


