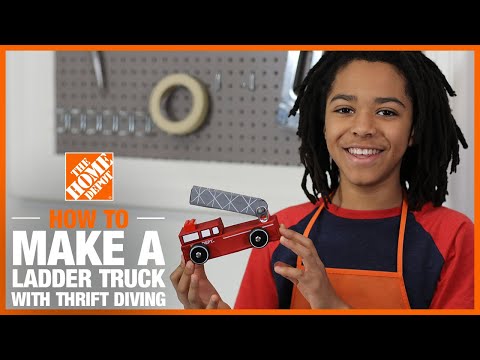
How to Build a Kids Ladder Truck
Last updated September 7, 2023
Presented by Serena Appiah of Thrift Diving.
Using common household items, you can create this fun craft project with your kids in just one to two hours! Here’s how you do it.
Difficulty:
Beginner
Duration:
Under 2 hours
Table of Contents
Tools & Materials
Sand the Edges
Glue Then Nail Down the Cab
Glue Then Nail Down the Light Bar
Assemble the Ladder Base
Attach the Ladder Base
Tools & Materials

Your kit should contain the following items to build your ladder truck:
- 1 light bar
- 1 body piece
- 1 cab piece
- 1 ladder base
- 2 ladder supports
- 1 ladder
- 4 wheels
- 4 axle pegs
- 3 long nails
- 2 short nails
- 1 long screw
- 2 short screws
You will also need:
- Fine sandpaper
- Wood glue
- Hammer
- #2 Phillips screwdriver
Sand the Edges

Start with sanding each wood piece to remove any rough edges. Remember to sand In the direction of the wood grain. Glue and nail the pieces together. Allow glue to completely dry.
Glue Then Nail Down the Cab

Lay the cab down with the nail holes on top. Start with two long nails.
Lay the body down with the wheel wells facing down. The edge with the screw hole is the back. Glue the cab on top of the front edge of the body. Make sure the screw hole is not covered. Make sure front and side edges are even. Nail them together.
Glue Then Nail Down the Light Bar

Lay the light bar down with the nail hole on top. Start a long nail. Glue the light bar in between the nail heads in the cab. Nail them together.
Assemble the Ladder Base

Stand the ladder base up. Place one of the ladder supports on top. Make sure the rounded top edge overhangs the hole in the ladder base and side and bottom edges are even. Using a short nail, nail them together. Turn it over and repeat to attach the other ladder support.
Attach the Ladder Base
Place the ladder base assembly on top of the back edge of the body and align the screw holes. Using a #2 Phillips Screwdriver, attach them together with the long screw.
Attach the Ladder

Slide the rounded end of the ladder in between the ladder supports and align the screw holes. Attach them together with 2 short screws. Adjust the short screws so that the ladder is not too loose or tight.
Add the Wheels

Slide an axle peg through each wheel. Put a dot of glue on the end of each axle peg and insert them into peg holes. Tap with a hammer if necessary.
Add Stickers or Paint

If you are painting the project, do not paint inside or around the peg holes. Painting inside or around the peg holes makes it difficult to insert axle pegs. Also, do not paint the joint area of the ladder and ladder supports to make sure the ladder moves. Allow the paint to dry completely.
Enjoy Your Truck!

Congrats, you've completed your ladder truck! You can wheel it anywhere you want.
Make a Home Version

Here are the tools and materials you'll need to make a homemade version:
Materials:
- 1 or 2 cardboard cereal boxes (2 to 3 pieces at 8 1/2
x 11 inches) - 2 soda can metal tabs
- 2 red LEGO bricks
- 4 half gallon milk container caps (or water bottle plastic caps)
- 4 machine screws or long screws
- Hot glue gun
- Craft paint for body
- Black spray paint or craft paint for wheels
- Black marker
- Craft markers
- Clear tape
- Paint brush
- Pencil
- Ruler
- Screwdriver or something pointy and sharp
Tools:
- Scissors
- Hot glue gun
Trace & Cut the Cab

This DIY crane comes with printable templates for:
Starting with the cab, print out the free downloadable template and copy it onto a cardboard cereal box. Cut out the template along the exterior border. Use your scissors to make relief cuts in the locations between the red dots and along the blue dots. This makes it easy to fold the cardboard into a box.
When cut out, the cab will look like this. What you may not see are the 1/4-inch foldable edges. On the pattern, the folds are represented with orange. These are the “wings” that will be hot glued in place to secure the cab as a rectangle.
Press your fingernail over the black lines to score the fold lines so that they’ll fold neat and clean.
Trace & Cut the Body

The fire truck body template can also be downloaded. You will also need to make some relief cuts so that the edges can easily be folded. The relief cuts are represented by the colorful dots. Using your scissors, carefully snip the areas between the dots.
Fold in the edges 1/4-inch and secure with hot glue. The flap will cover this edge. Secure flap in place with hot glue. The bottom of the body will hide the glued flaps.
Attach the Cab to the Body

With the cab and the body formed, use a hot glue gun to attach them together. Be sure the edges are aligned.
Add the Light Bar

Using hot glue and a LEGO brick, add the brick to the top of the cab positioned directly in the center of the cab.
Attach the Ladder Base
Place the ladder base assembly on top of the back edge of the body and align the screw holes. Using a #2 Phillips Screwdriver, attach them together with the long screw.
Attach the Ladder Supports

Soda metal tab tops are perfect for ladder supports! Hot glue one to each side of the ladder support.
Create a Ladder Axle

Roll up a piece of cardboard to fit through the soda tabs. This will hold the ladder in place and also allow it to move back and forth. Trim it to your desired length. Just make sure it doesn’t fall out of the metal soda tabs. It should fit snugly but still move when turned.
Trace & Cut the Ladder

The final printing and cut-out is for the ladder. The orange areas are edges that will be wrapped over and glued or tucked in and glued. Use your fingernail and score the folding lines.
Assemble the Ladder

Fold the ladder according to the template with hot glue.
Place a piece of tape on the bottom of the ladder and then poke a hole with a pencil into the ladder. The tape will prevent the cardboard from ripping. Make sure that it’s large enough for the rolled piece of cardboard fits through the hole.
Trim the square corners of the taped bottom of the ladder into a curve so that the ladder moves easily when assembled.
Insert the rolled up cardboard into the metal soda tab ladder supports, threading it through the ladder, and out through the other tab. It should fit a little snugly so it doesn’t come out. You can also add a bit of hot glue to the end of the rolled cardboard so that it doesn’t fall out.
Spray Paint the Wheels

Using black spray paint, add one to two coats. Don’t add paint to the backside of the wheels or the paint could rub off on your fire truck.
When the paint dries, use something pointy (like a screwdriver) to poke a hole in the middle of the plastic cap. Thread one of the machine screws or a long screw into the plastic cap.
Add Wheel Holes to the Body

Use a sharp pencil to create the wheel holes, being careful not to poke a hole too large.
Since cardboard is thin and the paint is water-based, this thin cardboard can feel a little damp while the paint is drying. Trying to create holes for the wheels is easier to do before painting the body.
Check that wheels fit properly. Be sure to position them so that they touch the ground and can roll easily when pushed back and forth. Next, remove them so you can paint the body. (Add them after the paint dries.)
Add Paint

Cardboard is fun to paint! Any small gaps along the edges of the cardboard is easily covered with paint. This is the fun part because you can add windows, a ladder pattern, lights on the light bar and even white-rimmed wheels!
Complete!

Your kids will absolutely love this fun kids workshop! It will take you about 1 to 2 hours and will cost you nothing but an afternoon with the family. That’s the best kind of craft project!
You can find this project and more on Home Depot! Be sure to check out ScienceFairCentral for workshop extension activities that can be done with these kids workshop projects!
With our kit and a few basic tools, you and your child can build this ladder truck together. Or get creative and gather some household supplies for a real DIY build.