How to Build a Raised Deck
Last updated September 7, 2023
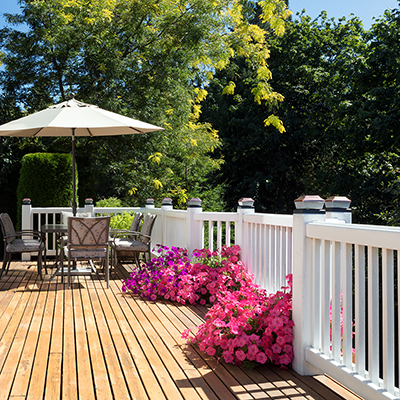
Raised decks are a perfect space for outdoor entertaining and relaxing. The style of deck you choose to build determines how you use your deck, as well as how you build it.
This guide will give you step-by-step instructions and some safety tips to help you learn how to build a raised deck.
Difficulty:
Advanced
Duration:
Over 1 day
Table of Contents
Considerations and Planning Your Deck
Layout Footings and Attach the Ledger Board
Dig Holes for Footings and Pour Concrete
Plumb and Brace the Posts
Build Beams on Top of Posts
Install the Joists
Considerations and Planning Your Deck

- This guide covers how to build a raised deck or elevated deck. In many areas, an elevated deck is defined as one that is higher than inches above the ground and is attached to the house. Raised decks require a railing around the perimeter, and they require a building permit. Elevated deck plans also include the use of a ledger board in their design. Check with your local building department to determine your local code requirements when building a raised platform.
- If your deck calls for concrete piers or footings set in the ground, call 811 before you dig. Your local utility company will mark the location of any water, gas and power lines in your yard. Avoid digging near any marked lines. Dig holes using a post hole digger or two-person auger. You can rent an auger and make quick work of digging holes. If using an auger, avoid any areas marked by the utility company. To be safe, dig by hand if a hole needs to be located within 18 to 24 inches of a marked utility.
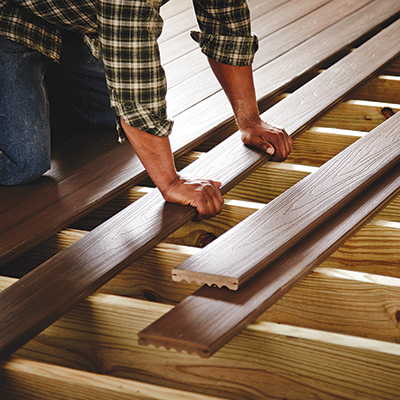
- Consider what type of deck boards you’ll want. Composite decking material installed with hidden fasteners creates a clean look and low-maintenance finish. There are a variety of composite decking styles and colors to choose from. Pressure-treated wood decking is a common, budget-friendly option that can be stained any color you want. Keep in mind that pressure-treated wood and other wood species decking require regular maintenance.
- Once you have a general idea of the design you want, bring your ideas to your local Home Depot for a detailed drawing. You can use this drawing to estimate deck materials, and to submit to the local building department for code approval. Keep in mind that if your deck requires a permit, the building inspector will need to check various stages of the deck build process.
- Raised decks require stairs and a landing, so keep this in mind as well when planning.
- This guide will cover how to build a low, raised deck that requires a railing and stairs.
Layout Footings and Attach the Ledger Board

A raised deck is attached to the house by a ledger and supported on the opposite end by posts set on top of piers. The terms “piers” and “footings” are often used interchangeably though they are technically not the same thing. Piers transfer the deck’s weight into the soil. Footings spread the weight out over a larger area. Depending upon building code requirements and soil conditions in your area, footings may also be required beneath the piers to spread the deck’s weight out. These specifications will be detailed in your deck drawings and guided by local building codes.
Your deck drawings will indicate the size of the ledger board, as well as the size, number and location of deck piers or deck footings. In the example video, the builder has opted to lay out the footings first. However, it’s often easier to set the ledger board first to use it as a reference point. You also won’t have to step over any string lines as you install it.
Here's how to attach the ledger:
- Begin by setting the ledger, which will need to attach to the rim joist of your house. The rim joist sits between the foundation and the finished floor height and is typically 1 1/2 inches above the foundation’s top edge.
- Verify the location of your rim joist from the basement or crawlspace.
- Remove the siding in the area where the ledger will be attached to the house. Remove several courses above that area as well. Cut away any housewrap at at the height where the finished deck height will be so that the sheathing is exposed.
- Place a layer of self-adhering flashing directly to the sheathing along the area where the ledger will go, and tucked several inches under the housewrap.
- Snap a line to indicate the height of the ledger.
- Attach the ledger to the house using code-approved fasteners. The size, type and spacing will be indicated on the drawings.
- Place a piece of aluminum flashing so that it fits over the ledger and tucks under the housewrap.
Here's how to lay out the footings:
- Using batter boards and mason's string lines, lay out the location of the piers and footings. These will provide the deck’s foundation. Batter boards are temporary frames used to mark the elevation and layout of your deck.
- Run the first line parallel to the house so that it runs through the center of where the piers will go.
- Run two more lines out from the house – one from each end of the ledger board. Use a level to plumb down from the end of the ledger and make a mark on the foundation. Use this mark as a reference for the string so that it is at the same height as the first line you ran.
- Run the opposite end of each line so that it crosses the line representing the footings.
- Square the corners using the 3, 4, 5 method. Measure 3 feet from where the lines intersect and make a mark on the string line. Measure 4 feet along the line that runs perpendicular to that line and make a mark. Measure between the 3-foot and 4-foot marks and adjust the lines until the marks are exactly 5 feet apart (leave the line representing the footings and adjust the side lines that intersect it).
- Mark deck pier and footing locations per drawings with spray paint. Use the string lines as reference points for your measurements.
Estimated time for a novice (with a helper) to lay out footing locations: 12 to 14 hours. Time includes removing siding and attaching the ledger.
Tip: Always be sure to wear proper safety gear.
Dig Holes for Footings and Pour Concrete

- Use a posthole digger or power auger to dig holes for the piers and footings.
- Be sure to dig below the frost line, if required by your local code.
- Place concrete tubing forms in the holes and level them so that they stick up about 1-inch above ground level. You can use scrap 1x screwed to each side of each form to help hold it level. The scrap 1x pieces should be long enough to stretch across the hole, suspending the tube in it.
- Use the mason’s lines and a tape measure to center the tubes according to the drawings, adjusting the hole locations as needed.
- If you want to be sure all the piers are the same height, use a long level. This isn’t usually necessary, though, as any inconsistencies can be made up in the post lengths that will be set on top of them.
- Backfill the holes around the tubing forms, tamping the soil down every so often as you go.
- Mix ready-mix concrete bags in a wheelbarrow per the manufacturer’s instructions using a shovel or mortar hoe.
- Pour the concrete mix into the tubing form, then place a post anchor bolt into the center of each footer before the cement begins to harden. Leave enough of the bolt above the footing to connect to the post base. Note: Use the mason’s string line stretched across the tubing forms to align the anchor bolts.
- Allow time for concrete to cure according to manufacturer’s instructions.
- Once the concrete has cured, set post bases over each anchor bolt and align according to layout indicated on the drawings.
- Don’t tighten the post base down all the way; leave the nut loose enough so that the base can be tapped in either direction later. The bolts can be tightened later, once the posts are set where you want them.
Estimated time (not including curing time): 14 to 16 hours.
Plumb and Brace the Posts

- Cut your posts a few inches long. You will cut them to length later.
- Set the posts in the post base and attach with appropriate post-base hardware nails or screws.
- Brace the posts plumb using 2x4's run at an angle from the posts to the ground.
- Depending upon the design of your deck, the top beam will sit below the joists (and so the ledger), or it will sit even with the ledger.
- If the beam will sit even with the joists, use a level to mark the bottom of the ledger on one post. Use a level to carry this line across all of the posts.
- If your beam will sit below the joists, use a level to mark the bottom of the ledger on one post. Now subtract the height of the beam from that mark and make a new mark below it. Use a level to carry this mark across the posts.
- Cut the top of the posts at the line you marked.
Estimated time: 6 to 7 hours.
Build Beams on Top of Posts

- Add post caps to the top of the posts to prepare for the beam that will run across them. Use post-base hardware nails or screws.
- Build a beam made of doubled 2x boards per your drawings on top of the row of posts parallel to the house.
- Be sure to align the ends of the beam so that they are aligned with the ends of the ledger. Use the string lines and a level to properly locate the ends of the beam.
- Depending upon the design of your deck, this beam will either serve as a flush-beam (in-line with the joists) or it will serve as the carrying beam for the joists.
Estimated time: 7 to 8 hours.
Install the Joists

- If you install the rim joists first, the rim can establish the deck’s perimeter. If your deck design uses a flush beam, attach the rim joist to each end of the ledger and the flush beam. If your deck design calls for the joists to sit on top of the beam, attach a rim joist on each end of the ledger and rest them on the beam. Then connect the two with a third rim joist that’s the same size as the ledger and parallel to it.
- Secure the rim joists in the corners using the appropriate hardware (like corner brackets), indicated by the drawings and your local building code.
- With the deck’s rim joist complete, it’s time to install the joists.
- Start by laying out the joist spacing on opposing rim joists. Pull your tape measure across the rim joist and mark the joist location, which will be every 12, 16 or 24 inches, per your drawings.
- Repeat this process across the flush beam or rim joist that’s opposite or parallel to the ledger. Be sure to pull your layout from the same side of the rim joist as you did in the previous step.
- Go back and use a square to mark a line down the inside face of the ledger and flush the beam or rim joist and place an x on the side of the line that is opposite from where you pulled your measurement from. So if you pulled your measurement from the left, place the x on the right of the line. If you pulled your measurement from the right, place the x on the left side of the line.
- These lines indicate the side of the joists and the x is where the ends of the joist will go.
- It’s typically easier to install joist hangers now, but you will need to make sure that they are placed at the proper height.
- To install joist hangers, you can make a simple template using a cut end of the joist material that’s about 3 to 4 inches long. Nail or screw a scrap piece of lumber on top of the cut joist piece so that it hangs over the end about 1 to 2 inches. Now, use this template to register the joist hanger on as you set it.
- Set the template so that it registers on top of the ledger / flush-beam / rim joist, and the cut end of the joist piece sits where the joist will go. Holding the joist hanger to the template, nail each hanger in place using the appropriate structural nails or screws (hold the sides of the joist hanger slightly loose so that you can slide the joist in place later). Repeat until all hangers are installed.
- Measure the joist length using the area closest to the ends (the area in the middle may have bowed in or out slightly). Now cut all of the joists to length, and set in the joist hangers.
- Nail the joists using hardware-appropriate structural nails or screws.
- Remember to crown the joists before you install them.
- Now, add self-adhesive flashing tape across the tops of the joists to help prolong the life of them. This is an optional step that adds some cost, but is becoming best-practice among professional deck builders.
- Fasten blocking pieces between joists per your drawings to prevent twisting of the joists. To properly size blocking, take your measurement from between the joists at the ledger or at the rim joist/flush beam. Measuring between the joists at mid-span will not yield an accurate measurement.
- If the beam sits below the joists and supports them, secure each joist to the beam using the hardware indicated on your drawings or dictated by code. This hardware will likely be a rafter tie or something similar.
- Once the joists are installed and attached to the beam, the bracing can be removed.
As shown in the example, you can install the joists first and then surround with the rim board. This works best if your plan calls for the joists to sit on top of the beam.
- Once the joists are connected to the ledger board, snap a chalk line to determine where the ends of the joists will be cut.
- Carry the markings down the side of each joist with a carpenter square.
- Cut each joist end along that line to be sure that they are even. Then, attach the rim board to the end and the other two sides.
Estimated time: 8 to 9 hours.
Install the Railing Posts

- Before you install the decking, you’ll need to install the structural railing posts for the deck railings. There are a few ways in which railing posts can be installed. In the example project, the 4 x 4 posts were attached to the inside of the rim joists.
- Railing posts cannot be notched by code and require special hardware which will be indicated on your drawings and dictated by your local building codes.
- Install railing posts as per the layout indicated on your drawings.
- Attach the posts to the framing using code-approved fasteners, making sure they are plumb in both directions.
Estimated time: 3 to 5 hours
Install the Decking

- To start the decking so that it’s parallel to the house, align the edge of the first deck board so that it is parallel to the house and run the fasteners in. Let the ends run long on either side.
- If you’ve pre-planned and are sure you will end with a full-sized board, you can start against the house and move outward.
- If you are not sure where the final board will land, start with the board farthest from the house and move toward the house.
- Continue running boards in this way, maintaining the appropriate spacing between boards. If using hidden fasteners, the fasteners have spacing built into them. If face-screwing pressure-treated wood decking, maintain about an 1/8 to 3/16-inch spacing between boards. 1/8 inch is typically recommended as the decking will tend to dry over time, shrinking and making the gap larger. You do want to have space between the deck boards to allow for drainage and air-flow.
- As you install the decking boards perpendicular to the joists, drive two fasteners through each board into the center of each joist. Position each fastener 3/4 to 1 inch from the edge of the board.
- As you move to the end of the deck (or towards the house), measure the distance at each corner to ensure you are moving in a straight line and will end parallel to the rim joist (or house, depending upon the direction you’re going).
Estimated time: 7 to 8 hours.
Tip: For the best appearance, stagger the seams between adjacent rows of decking. Seams should look random so keep them two or more joists away from one another.
Locate Footings for Stair Landings and Set in Concrete

- Your stairs will need to attach securely to the deck and finish on a concrete pad. If your deck is high off the ground, the drawings may call for a landing at mid-span of the stairs.
- For the transitional landing, use batter boards and mason’s line to lay out the location for the transitional stair landing footings per your drawings.
- Dig holes, set builders tubes, fill with concrete, add anchors and add post bases as you did above.
- Add posts and frame the landing, following the steps above as if it were a mini-deck.
- For the deck stair landing at ground-level, frame a rectangle out of 2 x 4's per your drawings, leveling it using stakes placed in the ground.
- Dig out the interior of the frame down about 10 inches. Fill with 8 inches of gravel, tamped level.
- Mix and pour concrete into the form, adding rebar as indicated by the drawings.
- Allow the pad to cure per concrete manufacturer’s instructions.
- Once cured, remove the form.
Estimated time (including making a form for the pad): 6 to 7 hours.
Tip: Locate the footings for the stair landing and pad after the main deck platform is built, as it is more accurate to measure when done relative to an existing deck structure.
Frame the Stairs

Stairs are comprised of the series of stringers that are attached to the framing and landing(s).
- Lay out the stringers per the drawings. Use a framing square equipped with stair gauges set at the appropriate rise and run marks (for example, 7 inches and 10 1/2 inches).
- Mark the rise and run for each step on the 2 x 12 stringer lumber.
- Cut using a circular saw, stopping shy of the perpendicular line so as to not over-cut.
- Finish each cut using a hand saw or jigsaw.
- Attach each stringer to the framing using stair stringer hardware.
- Attach posts to the stringers per the drawings using code-approved structural fasteners.
- Plumb posts and install the framing for the landings.
- Build the upper and lower stair runs in place.
- Add the riser and treads.
Estimated time: 16 to 18 hours
Tip: The landing could be replaced by another deck level, if desired.
Install the Railing

- If installing a composite or PVC railing kit, install the railing sleeves over the structural railing posts per the manufacturer's instructions.
- Run the railing and balusters per the manufacturer’s instructions.
- If building a wood railing, build the railings in sections to be installed between posts.
- Use the design and baluster spacing indicated on the drawings.
- Attach railings to the posts using structural screws per local code requirements.
Estimated time: 12 to 14 hours.
Building a raised platform requires careful planning, some DIY experience and reliable tools. However, a well-built elevated deck can add visual appeal to your outdoor space. A functional deck also means more space in your home to relax.
If you’re ready to start your project, consider tool rental to get your project done. Use it once, then bring it back – no maintenance required, and you won’t need to store it either. If learning how to build a raised deck seems overwhelming, call on our services team and let The Home Depot connect you with a professional who will get the job done right.