How to Build a Utility Cart
Last updated September 7, 2023
Presented by Erin Spain
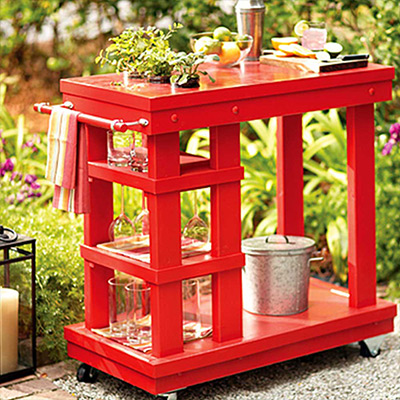
Building a utility cart may seem daunting, but we've got you covered. A utility cart has many uses. Use it as desk storage or wheel it into another area of your home. You can store books, knickknacks and more on this stylish wood cart.
Difficulty:
Beginner
Duration:
Under 2 hours
Table of Contents
Cut Your Wood
Sand
Build Boxes
Attach Sides/Handles
Add Screws for Reinforcement
Patch Nail Holes
Cut Your Wood

Before you begin, make sure you have these tools and materials:
●
16-inch wide project panel
●
Three 1- x 4-inch boards at 6-feet long each
●
Two 2- x 2-inch boards at 6-feet long each
●
4 casters
●
Paint or stain
●
Brad nailer
- 1 1/4-inch and 2-inch long brad nails
●
Drill/Driver
●
Wood glue
●
Sander
●
Measuring tape
- Pencil
●
Countersinking drill bit (optional)
●
Wood filler
- Putty knife
●
2-inch wood screws
●
Saw
●
Safety gear
First, cut your project panel into three pieces, each 12 inches wide. These pre-laminated project panels can be found at The Home Depot, or you can laminate your own using 1x lumber and wood glue. Next, cut your 1 x 4 board into six pieces at 12 inches long and six pieces at 17 1/4 inches long. You can use a miter saw for this but a circular saw is fine, too. Cut your 2 x 2 pieces into four pieces at 32 1/2 inches long each and two pieces at 12 1/2 inches long each.
Sand

Sand everything smooth using a random orbit sander.
Build Boxes

Build three boxes which will serve as the three tiers for the cart. Assemble them using wood glue and a brad nailer with 1 1/4-inch long brad nails. Attach your shorter edges first, applying wood glue along the edge of your project panel piece and your 12-inch long 1 x 4 piece. Then nail it on with your brad nailer. Attach the opposite short edge the same way. Next, attach your longer side pieces the same way too. Repeat this process for all three of your boxes.
Attach Sides/Handles

Lay your boxes on their long side and position them 8 inches apart. Next, measure and mark 2 3/8 inches in from either side of each box. Mark 2 inches from the bottom end of your 2 x 2 pieces. Now, line up the 2 x 2 inside the marks you made on the boxes, and line up the bottom with the 2 inch mark you made on the 2 x 2 to ensure that the bottom box is 2 inches from the bottom edge of the 2 x 2. We will be attaching casters to those so they will serve as the legs. Apply wood glue and attach your 2 x 2 boards with your brad nailer and 2-inch long brad nails.
Then, flip it over and measure, mark and line up your 2x2s the same way you did on the other side, then glue and nail them on. Stand your cart upright and glue and nail your 12 1/2-inch long 2 x 2 pieces on as handles using 2-inch long brad nails.
Add Screws for Reinforcement

Using a countersinking bit, pre-drill holes from the inside. This is optional, you could skip the countersinking bit if you’d prefer. Then, drive in 2-inch wood screws from the inside for added reinforcement.
Patch Nail Holes

Use wood filler and a putty knife to patch over nail holes. Sand smooth.
Paint or Stain

Choose any paint or stain you like. This cart is stained with Varathane Special Walnut stain, with a pre-stain wood conditioner applied first.
Tip: Add a polycrylic topcoat for protection.
Add Casters

- Lay your cart down on its side and position your casters.
- Pre-drill pilot holes into each hole.
- Attach the casters with small screws.
Finished!

Once you've finished your wood utility cart, fill it with whatever you desire and roll it beside a desk or area that needs it.
Making a DIY utility cart is fun and an easy way to keep clutter contained. All you need is a little time and the necessary tools. If you're looking for certain items to complete the project, The Home Depot delivers online orders when and where you need them.