How to Build a Wooden Headboard

Last updated January 2, 2024
Dress up your bedroom with a wooden DIY headboard featuring built-in LED lighting. All you need to build this headboard are basic woodworking skills, an afternoon and a few building supplies. Follow this guide to learn everything you need to know about how to make a headboard.
Difficulty:
Intermediate
Duration:
2-4 hours
Table of Contents
Choosing the Style for Your DIY Wooden Headboard
Tools and Materials for a DIY Wooden Headboard
Measure and Cut Plywood for Your DIY Headboard
Cut the Outer Frame of a DIY Wooden Headboard
Cut the Support Pieces for the Headboard Panels
Cut and Sand Raised Panels for the DIY Headboard
Choosing the Style for Your DIY Wooden Headboard

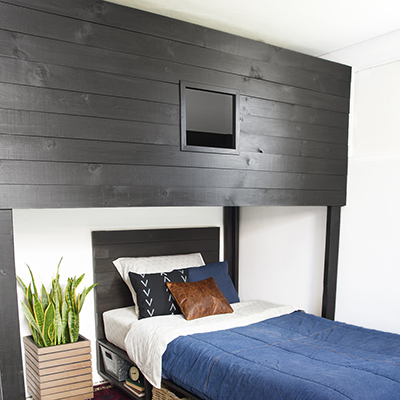
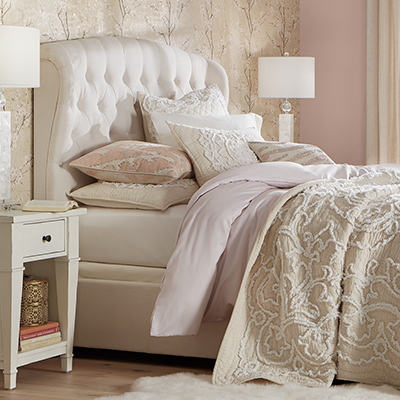
A DIY wooden headboard should match the look of the room. Knowing how to make a headboard can save you money and allow you to put your own unique spin on your bedroom decor. Start by choosing wood boards that reflect your style. Western red cedar provides a rustic look while sanded wood or painted MDF has a sleek and modern appearance.
Other options that affect the look of a headboard are the thickness of the border materials, the paint or stain finish and the hardware you add for accents.
The headboard featured in this guide is made with 1X lumber which is 3/4-inch thick. However, you can craft the border from any type of wood as long as the interior dimensions of the headboard stay the same.
Common bed widths are:
- Twin - 38"
- Full/double - 53"
- Queen - 60"
- King - 76"
Start by cutting out a template to the desired size of the headboard you want to build. Consider the height and width of the headboard. For best results, tape your template to the wall behind your bed to ensure that it is proportional and will fit the space. The headboard in this guide is designed to fit a queen bed and has an interior width of 60 inches. (This size headboard also works for a full bed if you like an overhang on each side.) Adjust the headboard height as needed. If it's too low, you won't see it behind your bed pillows.
Tools and Materials for a DIY Wooden Headboard

Take the frustration out of this DIY project by gathering the tools and materials you need before you begin. To build this headboard, you'll need the following:
- Miter saw
- Table saw or track saw
- Brad nailer
- Impact driver or drill with bit for screws
- Sander and sandpaper, 80, 120 and 220 grit
- Router and piloted bit in the profile you choose (optional)
- Hot melt glue gun (double-sided tape may be used in place of hot glue)
- Square
- Tape measure
- Pencil
- Mallet or hammer
- Caulk gun
- Painting supplies
- Stud finder
- Level
Materials:
- Two 1x4x8 boards
- One 1x12x6 board
- One 1x6x6 board
- Three 1x2x8 furring strips
- One 4x8 sheet of 1/4” sanded composite plywood
- 16 feet of 3/4” inside corner cove moulding
- 16 feet of 3/4x1/2” flat moulding
- 16 feet LED light tape strip and joining connectors
- 1” brad nails
- 1-1/4” brad nails
- 2” brad nails
- 1-1/4” #6 screws
- 2-1/2” screws
- Wall anchors
- Wood filler
- Paint and paint supplies
- Paintable caulk
- Hot melt glue
Measure and Cut Plywood for Your DIY Headboard

Choose a piece of smooth plywood with no deep knotholes or blemishes. Measure and cut a piece of plywood to 18x60 inches using a track saw or table saw.
Using a track saw or a table saw, cut a piece of plywood to 18x60 inches.
Cut the Outer Frame of a DIY Wooden Headboard

Take care in cutting the outer frame of the headboard as it determines how straight it will hang on the wall. To cut the frame:
- Cut a 45 degree bevel at one end of a 1x4x8.
- Measure 61-1/2” from the long point and mark a line.
- Cut another 45 degree bevel at that mark, making this piece 61-1/2” on the long side.
- Repeat with the other 1x4x8.
- On the two remaining pieces of 1x4 with the 45 degree bevel already cut on the end, measure and mark a line from the long point at 19-1/2”.
- Cut a corresponding 45 degree bevel at the line on each piece.
Cut the Support Pieces for the Headboard Panels

Miter pieces fastened behind the headboard panels create the illusion of floating panels. They won’t be seen so the corners don’t need to be mitered. All of the miter pieces are cut from 1x2 inch firring strips. Cut miter pieces in the following sizes:
- Two 60" long
- Two 16-1/2" long
- Eight 8" long with 45 degree angles on each end
- Eight 4" long
- Four 3" long, to be used as spacers during assembly
Cut and Sand Raised Panels for the DIY Headboard

Raised panels are cut from 1x12 wood boards.
- Cut four pieces, each 12" long.
- Be sure the corners are square.
- Use a router or sander to smooth the wood surface and shape edges as desired.
Assemble the Frame for the DIY Wooden Headboard

Place all four frame pieces on a flat work surface and arrange them into a rectangle.
- Working from one corner, apply glue to the edges of each frame piece.
- Position the outside corners so they are aligned and the top surfaces are flush.
- Carefully nail two 2” brads into the joint on each side.
- Continue by repeating the gluing and nailing on remaining corners, being careful not to twist or pull corners loose that have already been joined.
Add Internal Supports to the Headboard

Place the back of the frame face up on the work surface. Measure and cut 1x2 pieces of wood into two 60 inch and two 16-1/2 inch 1x2 pieces for the internal supports. Position along the inside edges of the frame.
- Adjust the lengths, if necessary.
- The 1x2s should be standing on edge with the wider side flush against the inside of the 1x4 frame.
- Attach to the frame with glue and 1” brad nails. Nail from the inside so the holes will not need to be filled.
Mark the Layout for Panels on the Headboard Frame

Place the back panel of the headboard into the wood frame on top of the supports. Trim plywood if needed for a snug fit. If there is a small gap, that’s not a problem, as it will be covered by moulding. Follow the remaining steps to assemble the headboard:
- Remove the headboard back panel from the frame.
- Evenly space the four raised panels on the headboard back panel. If needed, use measuring tape accurately position the panels between the edges and equal distance from each other.
- Adjust the panel placement by measuring with 3” spacers. The panels should be 3” from the edges and 3” from each other.
- Lightly mark corners of each panel with a pencil or painter’s tape on the headboard back panel and then remove the panels.
- Assemble the panel supports with two 8” pieces on the sides and two 4” pieces across the top and bottom to form a frame. They will be glued flat with 45 degree angles facing outward. This is to give the LED light tape an eased corner; it can’t take sharp 90-degree bends.
- Attach the miter frames using one 2” nail in each corner. They’ll be slightly loose but that’s okay since their structure will come from being attached to the plywood in a later step.
- Arrange the panel supports inside each set of marks, measuring placement with the 3” spacers. It should be 3” from each corner mark to each corner of the support.
- Trace around each of them, inside and outside, with a pencil.
- Lift the support and apply hot melt glue inside the marked lines.
- Press the support back into place, inside the alignment marks.
- Position a piece of scrap wood under the location of the holes on the headboard back panel before drilling.
- At the lower left-hand corner of each support, drill two 1/2” holes about 1” apart from each other. The LED light tape will go through them.
- Drill eight pilot holes through the supports and plywood back.
Attach the Headboard Back Panel to the Frame

- Measure the corner angles to ensure they are square. To do this, measure across both sets of opposite corners. The measurements should be the same. If they aren’t, push the corners that measured longer toward each other until the measurements match.
- Apply glue to the upward facing edge of the inner supports, where they contact the headboard back panel.
- Put the headboard back panel back into place within the outer frame and attach with 1” brad nails.
- Measure, miter cut and install moulding around the inside of the frame with glue and 1” brads. This will give the headboard a finished appearance.
Install French Cleats to the DIY Wooden Headboard

The headboard will be attached to the wall with a method known as a “French cleat.” This holds the headboard securely to the wall while making it easily removable.
This step is best achieved using a table saw but a circular saw or a track saw will also work.
- Cut the board to 58-1/2 inches long.
- Mark a line 1” from an edge, down the entire length of the board.
- Set the saw blade to cut a 45-degree bevel, and cut along the line.
- The direction of the bevel isn’t important, so cut in the direction that allows the widest part of the saw’s base plate to sit on the wider part of the board.
- The easiest and safest way to cut this is to place the board on top of a surface that can be cut in the process such as a piece of foam board, scrap lumber or other sacrificial work surface.
- After ripping the bevel, cut the wider board to 50” long.
- Use sandpaper to smooth sharp edges created by cutting the 45-degree bevel.
- Lay the headboard face down on a flat work surface.
- The narrow strip attaches to the inside top of the headboard. Arrange it so that the beveled edge points to the floor when the headboard is upright. The bevel should face into the headboard with the flat face of the piece facing out. The flat back face should be flush with the back edge of the frame.
- Apply glue to the three surfaces then drive two 2” brads into each end and five 2” brads evenly spaced across the top.
Finish the DIY Wooden Headboard

To finish the headboard, use wood putty or filler to cover nail holes and fill any cracks. Next, use fine grit sandpaper to smooth rough places and sharp edges. If painting, use painter’s caulk to fill any gaps. When dry, paint or stain the headboard as desired and allow to dry completely.
Install LED Light Tape Behind Wooden Headboard Panels

It's easy to install LED light tape. Some kits come with connectors or connectors can be purchased. To begin, thread the lights through the first hole and around the support pieces for the floating panel. If needed, use connectors to pass the lights through the holes.
Thread the lights out through the second hole and back in to the first hole on the next panel. Repeat the process until all four panels have been lit. Follow manufacturer's instructions to determine how to connect the power supply, terminate the end or troubleshoot other technical issues.
Install Panels on the Wooden Headboard

Working one at a time, position a panel on top of a miter frame, being careful to align the panel with the corner marks on the headboard back panel. Lift the panel and apply hot glue on the face of the miter frame, then carefully reposition the frame so that the corners realign. Repeat this process to install all four panels to the headboard. Turn the headboard over and drill 1 1/2" wafer head screws through the pilot holes to attach the panels to the plywood. Be careful not to drive the screws so deeply that they pull through the plywood and come through the front of the panel.
Attach the DIY Wooden Headboard to the Wall

The headboard can be adapted to attach to a bed frame with a pair of 1x4 boards, but attaching it to the wall is easier and sturdier.
- The first half of the French cleat is already attached to the back of the headboard.
- Determine the position of the headboard on the wall.
- Mark placement with painter’s tape.
- Measure 3” down from the top line and make another line. This is the top of the wall portion of the French cleat.
- Mark the center point of this second line.
- Use a stud finder to locate wall studs within the area where the cleat will be attached.
- Attaching the headboard to wall studs will produce the sturdiest installment, but drywall anchors can be used if necessary.
- Mark the center of the 50” cleat board.
- The bevel will at the top of the board facing the wall. The flat side of the board should face into the room.
- Align the center mark on the cleat with the center mark on the wall. This piece can be moved approximately 5 inches to the left or right if needed. For best results, attach each end into a stud.
- Drive one screw through the cleat, into a stud. This screw should be about 1-1/2” from the top edge of the cleat.
- Use the level to be sure that the cleat is level and drive another screw through it and into another stud.
- Drive two 2-1/2” screws through the cleat, into each stud. One row of screws should be about 1-1/2” down from the top, the other row should be about 1-1/2” up from the bottom.
Knowing how to build a headboard lets you add custom style to your bedroom—and it can save you money since you won't have to purchase a headboard. When you're ready to start your project, use The Home Depot Mobile App to get everything you need delivered right to your doorstep.