How to Crosscut and Rip with a Circular Saw

Last updated September 7, 2023
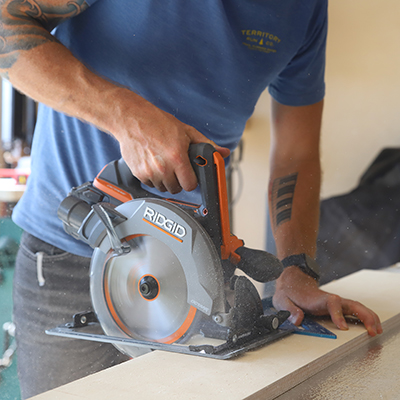
Getting accurate crosscuts and ripping cuts with a circular saw are fairly easy tasks if you take your time, cut at slow speeds and use a guide.
This guide highlights the procedures for operating the circular saw to get straight crosscuts and ripping cuts, along with instructions on how to make a ripping cutoff jig.
Difficulty:
Beginner
Duration:
Under 2 hours
Table of Contents
Saw Basics
Crosscutting with a Square as a Guide
Ripping with a Rip Fence
Straightedges and Commercial Saw Guides
DIY Saw Guide
Saw Basics

There are a few things to keep in mind when cutting wood:
- The familiar line “measure twice and cut once,” needs no explanation.
- Another truism is “cut on the waste side of the line.” What this means is to measure and mark your line, then make your cut on the portion of the wood that isn’t the piece you measured for. Of course, you probably want to keep the rest of the board – but as far as the piece you want to keep is concerned, it’s “waste.” Cutting on the line or the “keep” side will result in a part that is slightly shorter than you want.
- When a saw cuts wood, the width of the blade becomes sawdust, the term for this is “kerf” and it’s usually about 1/16-inch wide. This small number adds up over many cuts and has to be accounted for when figuring how much material will be needed for a project.
- Crosscutting is cutting across the grain of dimensional wood like framing lumber, molding or fence posts.
- Ripping is cutting in the same direction as the grain in dimensional wood and is best done with a dedicated ripping blade.
- When cutting sheet goods like plywood or MDF, wood grain isn’t an issue, but the terms remain the same. Crosscutting refers to cutting across the short dimension and ripping means cutting along the long dimension. While not technically correct, these terms get the point across.
Crosscutting with a Square as a Guide

- A rafter or “speed” square makes an excellent saw guide for crosscuts on dimensional lumber.
- Mark your cut line as normal.
- Line up the saw blade on the waste side of the line.
- Align the lipped edge of the square over the straight edge of the wood.
- Slide the square to the side of the saw and use it to straighten the path the saw will take.
- Keep your fingers out of the blade’s path! Remember, it will protrude through the bottom of the wood, where you can’t see.
- Using a clamp to hold the square often gives better results, but at the expense of speed.
- Angles can also be cut this way; a clamp is a necessity for good results.
- Cutting wide boards that are 8, 10, 12 inches? Standard squares are the 7-inch size but 12-inch sizes are available, as are those with a foldable leg.
Ripping with a Rip Fence

Most saws have a slot and locking bolt on the shoe for a rip fence. This fence may not be included with the saw, but aftermarket and saw-specific models can be purchased as accessories. There are many options available.
- A basic rip fence is a “T” shaped device where the long piece fits into the slot on the saw foot and is held in place by the bolt. The short piece references the edge of the wood for straight, repeatable cuts.
- For a rip fence to work properly, the outer edge of the material being cut needs to be straight, as it will be the reference surface that guides the saw.
- Some fences have a provision for adding a longer piece of material to increase precision.
- Care is necessary to keep the saw from binding due to the cut wandering away from the edge. The fence can put pressure on the side of the blade and cause kickback. This is primarily an issue when cutting wood that has a pronounced grain and the saw is being pushed too fast.
Straightedges and Commercial Saw Guides

- Much like crosscutting with a square, a straightedge like a level or a straight board can be clamped to a workpiece to guide longer cuts.
- Commercial guide systems are available that provide an attachment for the saw and a track to hold it straight.
- Track saw systems include a special plunge saw and a guide track that it slides along. These are the height of circular saw precision.
DIY Saw Guide

- These are often called “door boards,” as they are used on construction sites for trimming the bottom of doors.
- You’ll need a sheet of plywood, MDF or tempered hardboard with one perfect edge, some wood glue, nails and clamps. Thickness of the material isn’t important, go thinner if weight is a concern or thicker if durability is most important. Keep in mind that you’ll loose the thickness of the material from the cut depth of the saw.
- Measure 3 inches from the good edge and mark a line down the entire length of the sheet.
- Cut this line as close to straight as possible, but it isn’t critical to the guide’s usefulness.
- Measure the distance from the saw blade to the edge of the foot. This needs to be in the longer direction, usually towards the motor.
- Add an inch to this measurement and place a mark at both ends of the sheet.
- Align the strip that was cut off with the factory edge at these two marks.
- Make a mark at each end of the board 1-1/2 inches from the cut edge.
- Remove the strip and cut along this line. This creates the base of the saw guide.
- Apply glue to the strip and to the area where it was on the base.
- Align the factory edge with the marks, as before, and nail it in place.
- Here’s where the precision comes from – trim the cut edge from the guide by moving the saw along the factory edge.
- The resulting edge of the guide shows exactly where the saw will cut and makes straight lines easy. Use the 1-1/2 inches of overhang for clamping.
- These guides can be made in custom lengths if needed. For example, if trimming doors is your job, make one to fit the widest door.
Learning how to crosscut and rip with a circular saw is made simple with this handy guide. Learning the basics will help with all your DIY projects involving a circular saw. Whether you need the right circular saw or more, The Home Depot delivers online orders when and where you need them.