How to Cut Down a Tree
Last updated January 27, 2025
Knowing how to cut down a tree can be helpful when you need firewood or if a tree is dead, unhealthy or too close to your home or other structures. But cutting down a tree, or felling a tree, can be a dangerous job. It’s important to take proper safety precautions or to leave the job to a professional if necessary. Try to gain experience with straightforward felling jobs before taking on trees that are large, diseased, leaning, hollow or are close to structures or utility lines. There are times that even the most experienced doer needs to call a professional.
If you determine that the tree you want to remove is within your abilities, the steps provided will teach you how to remove a tree safely. The tree we remove in this guide is a healthy, straight standing tree of moderate size.
Tip: Before getting started, be sure your chainsaw is ready to cut. Sharpen the chain if needed.
Difficulty:
Advanced
Duration:
2-4 hours
Table of Contents
Assess the Site and Tree
Clear the Area and Create an Escape Path
The Hinge, Notching and Felling Cuts
The Felling Process
When the Tree is on the Ground
Assess the Site and Tree

First, assess the tree and the area for possible hazards you’ll want to avoid. You may need to change your felling plan based on your assessments.
- Determine whether the tree is alive or dead and check for damage or disease. Dead, severely damaged or diseased trees can present unanticipated problems, so they are best left to a professional.
- Find out if the tree is hollow. Use a hammer or axe poll to “sound” the trunk.
You can also use an increment borer, which checks the center of the tree for density and does not hurt the tree. - Account for the natural lean of the tree and its balance of limbs. This information can help you determine in which direction to hinge and fell the tree.
- Vines can create a dual hazard. They can prevent the tree from falling properly and they can pull objects along with them as the tree falls.
- Identify other trees where the tree you’re cutting might get caught. A tree that gets hung in the branches of another tree is difficult to remove and very dangerous. Do not cut the second tree to free the first one. The best answer to this problem is to drop the tree in a location where it cannot become hung up by other trees.
- Similarly, check for overhead utility lines. If you can't avoid them, this may be a job for an arborist with a lift bucket or a climber. Alternatively, some utilities will temporarily disconnect lines for tree removal. It’s also worth noting that if the problem tree is close to a utility line, the utility may send their arborists out to remove the tree for you.
- Make sure you are cautious of structures and buildings within the falling area and hinge the tree accordingly.
- Check the area for underground utilities. Electric, gas, water or sewer lines, as well as cisterns and septic tanks, can be damaged by the impact of the tree or limbs that can penetrate several feet into soft soil.
- Move all vehicles well outside of the falling area.
- Make sure all people not involved with the felling are well outside of the work area. Pets should be kept out of the area as well.
- Check the direction of the wind. A tree’s canopy acts like a sail, an effect which is multiplied many times when leaves are present. Even a slight wind can make a big difference. Know the weather forecast to have a better idea of how winds might change during the felling process.
- Continue to assess the job as the cutting progresses. If the tree isn’t falling, work may be paused and the felling plan can be adjusted, although room for adjustment typically decreases as work progresses.
While assessing the tree, determine its height using the following steps:
- Find a straight stick that’s a bit longer than your arm.
- With arm extended to the front, hold the stick so that the end touches your cheek.
- Keeping your hand the same distance from your eye, swing the stick upwards until it is at a 90-degree angle to your arm.
- Keep the stick 90 degrees to your arm and sight down your extended hand until it aligns with the tree where it meets the ground.
- Move closer to or farther from the tree until your hand appears aligned with the base of the tree and the top of the stick is aligned with the top of the tree.
- Measure the distance between your standing position and the tree. This measurement will be within a few feet of the tree’s height.
Clear the Area and Create an Escape Path

- Before you start felling a tree, remove any underbrush or other objects immediately at the tree that might hinder your vision, movement or operation of the saw.
- Once work has commenced, there should be nothing to hinder or distract the saw operator from the task at hand.
- Remove any trip hazards around the tree and in the escape path.
- Plan your escape path. The escape path should be at least 15-feet long and in a direction 45-degrees away from the felling direction of the tree. Do not retreat directly opposite to the falling tree, as they sometimes skip off the stump and move backwards with great speed and force.
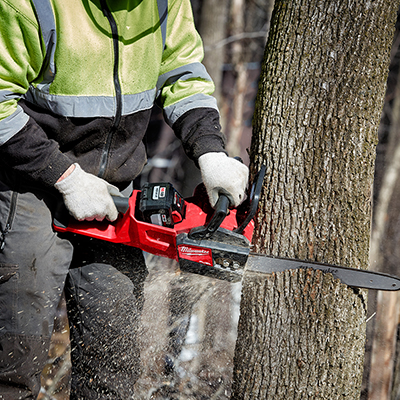
Safety Tip: When removing a tree and surrounding underbrush, make sure you have the appropriate personal protection equipment. Work gloves will safeguard
your hands from rough tree bark and jagged branches. Ear protection will shield your ears from the harsh sounds of the chainsaw. Safety glasses will protect your eyes from flying debris.
Chainsaw chaps, or protective trousers, will protect your legs from a running chainsaw. Finally, a hard hat or helmet will protect you from any falling branches.
The Hinge, Notching and Felling Cuts

Hinge:
- The hinge determines the direction of fall and is the most important part of the felling process.
- The hinge is created by two cuts: a notch that is sawn into the tree facing the felling direction and the felling cut that is made from the opposite side.
- The wood left between the two cuts is the hinge that helps guide the tree as it falls.
- If the hinge is too thin, it will not have the strength to keep the tree from veering to one side. If it is too thick, the tree might split or not fall at all.
- A hollow, dead or diseased tree may not have sufficiently strong wood for a hinge. Judging this requires experience and is not the job for a novice.
Notching and Felling Cuts:
- For a straight-standing, strong tree the notch should be about 20 percent of the tree’s thickness or diameter.
- The felling cut should be about 70 percent of it. This leaves about 10 percent of the wood to act as the hinge.
- Measure these percentages and mark them out with a lumber crayon. It’s better not to estimate these as you cut the tree.
- You’ll be able to forgo pre-marking trees as you gain felling experience.
Measuring Diameter:
- The diameter of the tree is measured at 4 1/2-feet from the ground, also known as “DBH” or “diameter at breast height.”
- Do not include the bark in the measurements.
- If needed, chip away some bark with the axe to make these measurements. Some trees, like hornbeam, have very thin bark while some pine trees have bark over an inch thick.
The Felling Process

In a straightforward case, where the wood is strong, the tree has very little lean in any direction and there is no wind blowing, here's how to cut down a tree:
- Cut a notch that faces the direction the tree should fall. An open-faced notch is preferred, which means it’s about 70 degrees into the tree from the top of the notching cut. This should only cut into about 20 percent of the tree’s thickness.
- Finish the notch by sawing a line parallel to the ground to join it at the base of the triangle. The two cuts should meet exactly and can be cleaned up if needed. Plan the cut so that if you were to face the tree directly, that the notch would expose 80 percent of the tree’s width.
- The felling cut will be parallel to the ground, directly from the back of the tree and toward the notch. Stop the cut before reaching the notch to create the hinge. Stop at a point that ensures you create a hinge that equals 10 percent of the diameter (DBH).
- After the felling cut has progressed a few inches, stop cutting. Place a plastic felling wedge into the space left open by the saw cut, also known as the kerf, and tap it in with the back of your axe or a hammer. Ensure that the saw’s chain doesn’t touch the wedge.
- Re-start the cutting, checking periodically to make sure the wedge has not fallen out.
- Wedges can be added as space allows, but it is not often necessary to use more than one or two. Do not drive the wedges deeply while cutting, only enough to hold them in place until the hinge is created.
- Once you’ve made the hinge, the tree may begin to fall on its own. If so, call out to any helpers and take your escape route. If it doesn’t fall on its own, drive the wedge into the saw kerf until the tree begins to fall. Then call out to your helpers and take the escape route.
Safety Tip: While cutting, consider wearing a face mask or respirator to prevent inhaling bark dust, mold and other debris.
When the Tree is on the Ground

Once the tree has fallen, finish the job by limbing and bucking the tree. Limbing is the process of removing the branches from the trunk. Bucking is the process of cutting the trunk into sections.
Limbing:
- Always limb starting from the roots of the tree and working your way to the top.
- Stand firmly with your feet apart and work with the saw close to your body. Try not to extend your reach too much or stoop. Bend with your knees, not your back.
- Stand on the left side of the trunk and limb starting on the right side of the trunk. Then limb the top, followed by the left side. This is called the “lever method.”
- Once you have entirely limbed the tree’s right side, top and left side, turn the tree to access the bottom side. If necessary, cut the trunk into sections first so you can easily turn it.
- When a limb that’s supporting the weight of the trunk is cut, the trunk is likely to move. Position yourself where you can avoid being caught underneath it.
- Be mindful of tension and compression. Compression is when wood is being compressed by bearing weight or being on the inside of a forced bend. Tension is when wood is being stressed on the outside of a forced bend. When there is compression on one side of a limb, there is tension on the other. Wood in compression will tend to close on the kerf and will pinch a chainsaw bar so tightly that it can’t be pulled free. Tension will cause the kerf to open, sometimes rapidly and violently.
- Kickback from the saw is likely during limbing, causing the saw to move rapidly towards the user with the chain still in motion. Kickback is caused by the top side of the bar tip coming into contact with an object. There are often limbs obscured from view by the limb that’s being cut. Contacting the obscured limb with the top portion of the bar tip causes kickback that is totally unexpected by the user, creating a dangerous situation.
- When a limb is under strain, make a shallow cut on the compression side. Then make another small cut on the tension side that will not connect to the first cut, proceeding slowly. Several of these alternating cuts may be needed to relieve enough tension for a safe cut.
Bucking:
- The same principles of tension and compression apply, although it’s usually the greater weight of the trunk that creates danger, rather than a springing action. Be careful of bar pinching. The tree can hold the bar so tightly that it can’t be removed without cutting it free with another saw or lifting the trunk with heavy equipment.
- If you’re bucking a tree that’s lying flat on the ground, be careful not to cut into the ground.
- Supporting and lifting the tree at one end can help you avoid cutting into the ground, but it also makes pinching more likely. If the tree is supported at one end, cut through 1/3 of the trunk’s diameter from the bottom, then finish the cut from the top.
- If the tree is supported at both ends, cut through 1/2 of the trunk’s diameter from the top, then finish the cut from the bottom.
- A sawbuck can make bucking a tree easier.
Cutting for Firewood:
- If the tree is to be bucked for firewood, measure the fireplace or fire pit to find the best length. Firewood is usually split, which is aided by square end cuts at this stage.
- Splitting firewood can be done with a splitting maul or a powered splitter.
- Stacking firewood serves two purposes, to store the wood and to dry, or season, it before burning. Burning unseasoned wood in a fireplace will create creosote buildup in the chimney, resulting in a fire hazard. Most hardwood trees need 12 to 24 months of seasoning before they should be burned.
- Softwood trees, coniferous trees with needles and cones, should not be burned in most fireplaces or wood stoves. Check with the manufacturer of your equipment to verify before burning wood in them.
Disposal:
- If the wood isn’t going to be used, it needs to be disposed of in accordance with local laws.
- Some states require burn permits for disposal by open fire.
- Some landfills will accept trees for a fee.
- Some localities offer free yard debris removal on certain days of the year.
- A woodchipper is an efficient way to dispose of limbs and leaves.
Cutting down a tree can be a dangerous yet necessary job that gets easier with experience. If you’re just learning how to cut down a tree, take the time to carefully assess the site, plan your escape route and plan your cuts. Start with healthy, upright trees. If the tree you need removed is damaged, dead or very close to your home, consider calling a professional to fell the tree for you.
Chainsaws, chipper shredders, log splitters, power pruners, utility trailers and other necessary equipment are all available for rent through our tool rental center. Chainsaw rentals include a safety overview with our associates so you can complete your project with confidence.