How to Install a ClosetMaid ShelfTrack Closet Storage System

Last updated September 7, 2023
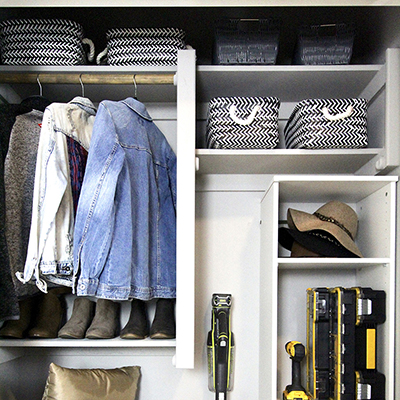
Organizing your closet means creating enough space for all the suits, dresses, shirts and shoes competing for limited room. The ClosetMaid ShelfTrack™ closet storage system is a flexible and effective home closet organization solution. The ShelfTrack system has adjustable brackets that enable you to move shelves up and down to various positions as your needs change. Read this guide on setting up the ClosetMaid ShelfTrack system in your closet space.
Difficulty:
Intermediate
Duration:
2-4 hours
Table of Contents
Getting Started
ShelfTrack Hang Track Installation
Install ShelfTrack Standards and Brackets
Install the ShelfTrack Shelves
Fixed Mount Installation
Getting Started

To get started with a ClosetMaid ShelfTrack installation, first measure the closet space and mark the walls for the hang tracks. These support the brackets that hold the shelving.
- Use a tape measure to mark the location for the single-hang track, which should be 70 inches from the floor. If you’re installing a double-hang ClosetMaid ShelfTrack closet storage system, measure and mark the higher track 84 inches from the floor and the lower track 42 inches from the floor.
- Hold the hang track against the wall at the desired height, with the overhang positioned at top.
- Place a level on the top edge of the hang track to make sure it is straight. Draw a line along the lower edge of the hang track to make its location.
Tip: Use a step ladder or step stool to mark the walls for the hang tracks.
ShelfTrack Hang Track Installation

Once you’ve measured the space for the ClosetMaid ShelfTrack installation, the next step is to affix the hang track to the wall.
- Using a stud finder, mark the walls where the studs are located.
- Place the hang track on the wall and mark all the hole locations. At least one of the holes must be over a stud to ensure the hang track is mounted securely.
Some of the hole locations will be over drywall, so you’ll need toggle bolts and anchors to attach the hang rack.
- Using a power drill, drill 1/2-inch holes into the drywall for the toggle anchors.
- Insert a bolt through each hang track hole and attach the toggle.
- Place the hang rack on the wall and push the toggles through the corresponding pre-drilled drywall holes. Make sure the toggles fold inward. Tighten the toggle bolts to attach the hang rack to the wall.
- Drill wood screws into the studs to secure the hang rack.
Install ShelfTrack Standards and Brackets

Now that the hang racks are attached, the next step for how to install a ClosetMaid ShelfTrack closet storage system is to install the standards and brackets that accommodate the shelves.
- Locate the notched end of each standard. Place the standards onto the hang track so the notch fits over the bottom rail. Space the standards no more than 24 inches apart.
- Each standard has pre-drilled holes for attaching the standard to the wall. Mark the walls at the holes.
- Drill 1/2-inch holes into the drywall for the toggle anchors. As you did with the hang rack, insert a bolt through each standard hole and attach the toggle.
- Place the standard on the wall and push the toggles through the pre-drilled drywall holes. Tighten the toggle bolts to attach the hang rack to the wall.
- If the holes in the standard are over studs, drill wood screws into the studs.
- Insert the brackets into the standards at desired heights and snap them into place.
Install the ShelfTrack Shelves

The ClosetMaid ShelfTrack system allows for shelving to be adjusted at any time. With this system choose from three types of shelving: Close mesh, also known as linen or pantry shelving, Shelf and Rod, or SuperSlide shelving.
- Insert shelving into brackets and snap into place.
- Finally, add drawers, shoe shelves and other accessories to complete the look.
Fixed Mount Installation

The Fixed Mount system is another closet storage option. With the Fixed Mount system, the back of the shelf is attached to the wall using wall clips. It's supported on the ends with sidewall brackets and in the middle with support brackets. Fixed Mount installation is less versatile than the ShelfTrack system, it is slightly more economical in the short term.
The Fixed Mount hardware includes:
- The wall clip anchors shelves to walls and is used in all types of installations. These anchors are spaced no more than 12 inches apart. The number of clips required is figured by adding one (1) for each foot of shelving (6 ft. shelf = seven clips).
- The wall bracket installs on side walls of closets to provide solid support and a finished look.
- The support bracket secures the shelf to the wall to provide support for the front of the shelf. Use one bracket every 36 inches.
- The vertical support pole supports multiple shelves. It comes with pre-drilled holes and clips to hold shelves and it is used in place of support brackets.
Follow these steps to install the ShelfTrack Fixed Mount hardware:
- Level, measure and mark for wall clip placement. Use a stud finder to locate the studs.
- Drill holes for wall clips.
- Insert all clips into holes by pushing on the pin with a hammer.
- Snap the shelving into the wall clips. Level shelf and secure to wall with support brackets.
Create the convenient and space-saving look you want in your closet with the ClosetMaid ShelfTrack closet storage system. Download The Home Depot Mobile App and shop for the installation supplies you need. The Home Depot delivers online orders when and where you need them.