How to Install Butcher Block Countertops

Last updated January 23, 2024
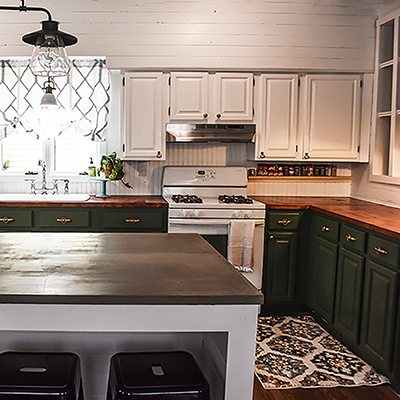
Butcher block countertops are a stylish and functional option for kitchen counters. Traditional butcher block is a durable surface for food preparation spaces that can last for decades when cared for and treated properly. Installing butcher block is an upgrade that adds charm and character to your kitchen decor.
Read this guide for the steps on how to install butcher block countertops in your kitchen.
Difficulty:
Advanced
Duration:
Over 1 day
Table of Contents
Why Butcher Block is a Great Countertop Material
Prepare for a Butcher Block Countertop Installation
Make Your Butcher Block Countertop Measurements
Make a Template for Your Butcher Block Countertop
Cutting Your Butcher Block
How to Join Butcher Block Countertops
Why Butcher Block is a Great Countertop Material

Butcher block is crafted from straight pieces of wood glued together into thick slabs. This creates a particularly strong work surface that's ideal for cutting blocks and boards.
There are many varieties of butcher block. Birch is what most people think of when they consider butcher block. It has a light wood grain and is affordable. Hevea countertops are known for their durability and the warm wooden tones they bring to countertops. Other popular varieties such as teak, acacia, maple, walnut and cherry offer darker tones with the same durability and longevity, but they can be more expensive. One new option is a butcher block with a live edge. This is where one edge of the wood is left natural, or unfinished.
Butcher block for countertops usually comes in a 25-inch depth. This covers a standard 24-inch-deep cabinet with room for an overhang and enough excess width to fill gaps along the wall.
Finally, butcher block has two sides. Side A is the countertop side and is usually blemish free. Side B shows more knots.
Prepare for a Butcher Block Countertop Installation

Before diving into your countertop installation, there are a few things to do beforehand to make the project easier:
- Remove all doors and drawers from your kitchen base cabinets so you don’t damage them when installing your butcher block countertop.
- Remove the sink and disconnect the garbage disposal and water lines.
- Remove appliances if needed.
- Finally, acclimate the butcher block material for at least 72 hours in the room where it will be installed. This helps to ensure accurate sizing.
It’s also important to keep the butcher block material away from dampness and heat, both of which can cause the wood to warp.
Make Your Butcher Block Countertop Measurements

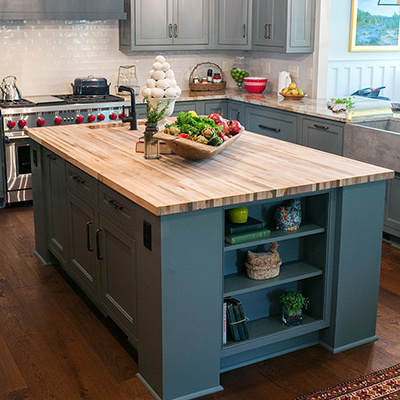
Installation of a standard butcher block countertop can be a straightforward process. Single-length countertops such as a butcher block island countertop are the easiest to install. If you have a long expanse, or the countertop must turn a corner, such as in an L-shaped configuration, you’ll need to connect two pieces of butcher block. This requires detailed measurements of the countertop space.
It is important to take your time getting the exact measurements. Begin by drawing your countertop on a sheet of paper. Then measure to get the following dimensions:
- Cabinet width at front, middle and back of counter.
- Cabinet depth along walls and at center points.
- Cabinet height. If you are installing a butcher block countertop as a replacement to a countertop you are removing, make sure the two are the same height, especially if you already have a backsplash in place.
Make a Template for Your Butcher Block Countertop

Once you have the measurements, make a template to fit the actual kitchen countertop space. Use cardboard for your template, or thin wood like tempered hardboard. It costs more, but tempered hardboard is sturdier and would be a small fraction of the total kitchen budget.
If needed, glue pieces of paper together to create a single continuous template. This step is essential in determining where to fit pieces of butcher block together and how much to allow for overhang. It’s also a good way to identify areas where the back wall might be curved. In this case, you’ll need to scribe, or cut, the back edge of the butcher block to conform to the shape of the wall.
Cutting Your Butcher Block

With side A up, lay your template on top of your butcher block material and tape in place. If the butcher block has visible lines, make sure you are aligning the template to the lines in the wood.
- Trace the template onto the wood with a pencil, including seams where two pieces will meet. Using a circular saw, cut one edge at a time. Take into account the distance from the saw shoe to the side of the blade and checking accuracy between each cut.
- Once cut, slide the piece of butcher block into place to ensure it fits. Use a fine-toothed blade and a straight edge to guide the saw.
To cut out an opening in the countertop for a sink:
- Set the butcher block countertop in place on your cabinets.
- Mark the center of the sink on the wall and along the front edge of the butcher block.
- Align the sink template on top of the butcher block and tape in place.
- Return the butcher block to your work surface. Using a drill, drill starter holes at each corner of the sink. Line up your saw, pull slightly up on the guard and slowly lower the blade into the butcher block. Continue for each side of the sink cutout. Finish with a jigsaw if needed.
- To mark for faucet placement, place the butcher block once again on top of cabinets and add the sink. Ensure that the fit is correct before cutting.
If you have an undermount or farmer’s sink, use a combo square to get the right distance from the countertop at the front and the back.
It’s possible that you’ll have to join two pieces of butcher block to turn a corner. To do this, you’ll need to use a miter joint or a butt joint. A miter joint is a diagonal cut where the two pieces of butcher block meet at an angle. This is ideal for an L-shaped countertop.
A butt joint works well when the two pieces of butcher block are different widths, or when one side of the L-shaped countertop is small. Rely on your template to get a snug fit for both pieces of butcher block.
How to Join Butcher Block Countertops

A key step in how to install butcher block countertops is to secure the pieces together and prevent movement. To do this, you'll need to connect them with a biscuit joint, pocket holes, miter bolts or all three.
How to Make a Biscuit Joint:
A biscuit joint is used when you need to connect two pieces of wood to make one continuous countertop piece, or when you are connecting two pieces of wood at a perpendicular joint. A biscuit is a small oval-shaped wood piece used as a link between the two pieces.
- Before starting, align the wood and mark placement on the underside (Side B) of the countertop.
- Using a biscuit joiner, cut a small oval-shaped slot into the side of the butcher block. Do the same with the other piece of wood so that the two oval-shaped holes align.
- Next, apply construction adhesive into the holes, insert a biscuit into one hole then wedge the biscuit into the aligning hole. Clamp the pieces together, wipe away excess glue and let dry.
How to Drill a Pocket Hole:
- Pocket holes are simply holes drilled at an angle on the underside (Side B) of your butcher block so that you can then screw it to another piece of wood for stability.
How to Make Slots for Miter Bolts:
- Miter bolts also connect two pieces of countertop together. Start by aligning the two pieces of butcher block countertop and mark placement on the underside (Side B). Using a router, pattern bit and pattern or jig for miter bolts, cut a recess or slot into the underside (Side B) of the countertop. Apply construction adhesive to the side edges of the countertop. Align the two pieces, insert the miter bolt, and screw in place.
Prefinish Your Butcher Block Countertop

When you have completed cutting, it’s time to prep your butcher block countertops for installation. Using fine-grade sandpaper, sand the top surface, sides and edges, working in the same direction as the grain of the wood. Use a router if you prefer a slightly beveled edge. When finished with sanding, wipe all sides of the wood with a slightly damp cloth to clean.
Finish Your Butcher Block Countertops

Seal or stain all bare wood before installation, including the underside (Side B). For a food-safe, waterproof countertop, use a blended tung oil finish. Most finishes are tung oil and additives. These blended finishes are food safe after the oil has completely cured.
Pure tung oil takes a long time to cure and requires more coats to protect the wood. Pure tung oil dries to a clear, honey color. Dark tung oil has a darker finish.
Polyurethane is another option, as it is food safe once completely cured.
Use a brush for even coating and apply at least four coats to ensure full coverage. Make sure to apply finish to the countertop surface's end grain; it will require more oil than the other surfaces because it draws the oil further into the wood.
Install the Butcher Block Countertops

To install your countertops, apply construction adhesive along the top edge of cabinets. Slide the countertop into place and ensure that the front of the countertop is aligned with the cabinets. Screw and bolt the countertop pieces together and clamp in place. If needed, also add countertop support brackets.
When dry, remove clamps and caulk with clear silicone along the walls and sink, if needed. Smooth silicone and let dry. Finally, install the sink and reconnect the plumbing and appliances.
Butcher Block Countertop Maintenance

To keep your butcher block countertops in tip-top shape, reapply butcher block oils, tung oil or mineral oil every few months, especially if your countertop has dry spots with no sheen.
Butcher block countertops add warmth and functionality to your kitchen. If you are uncertain that you have the skills to do it yourself, check out our countertop installation services and the cost to install butcher block countertops by The Home Depot.