How to Install Carpet
Last updated September 7, 2023
Learning how to install carpet can seem like a challenge. With planning, careful measurements and the right specialized tools, DIY carpeting installation is possible. Installing carpet yourself can save you money as you upgrade your flooring.
This guide will teach you how to install carpet, tack strips and carpet padding. It will also show you how to lay carpet so that it won’t bubble or loosen over time.
Difficulty:
Intermediate
Duration:
Over 1 day
Table of Contents
Measure the Room
Prepare the Subfloor
Install the Carpet Tack Strips
Install Carpet Padding
Measure & Cut the Carpet
Lay the Carpet & Secure the Seams
Measure the Room

When installing new carpet, start by taking accurate measurements of the room. Measure the length and width of the room. Multiply these measurements together to find the square footage.
Carpet is measured in square yards. One square yard is 9 square feet. To convert square feet to square yards, divide the square footage by 9. Example: 90 square feet/9 = 10 square yards
If the room isn’t a perfect rectangle, measure the room's square footage in sections. Then, add them together to find the total square footage. This guide covers how to put carpet down in a room that’s square or rectangular.
Once you have measured your room, order the carpet. Order 10 to 20 percent more carpet than you need to be sure you have more than enough to cover the floor. You'll also need to get tools and flooring supplies, like tack strips, adhesives and edging, for your carpet installation project.
Prepare the Subfloor

To get the room ready for carpet installation, begin by preparing the subfloor:
- Remove any existing carpet or flooring.
- Thoroughly sweep and vacuum the subfloor. The subfloor should be clean, level, free of cracks or other damage and completely dry. Make any necessary repairs before installing new carpet.
- Remove any doors that open into the room, including closet doors.
- If you’re replacing old wall-to-wall carpeting, you can leave the baseboards in place. If you’re replacing a different type of flooring, you’ll likely have to remove and replace the baseboards.
- You can reinstall baseboards before or after installing the new carpet, depending on your preference. In this guide, we install them beforehand.
- Check your carpet manufacturer’s recommendations for mounting baseboard. Most recommend installing beforehand and leaving an approximately 1-inch gap above the subfloor. This gap allows space for the carpet and carpet padding. It will vary based on the thickness of your carpet and padding.
Install the Carpet Tack Strips

When the subfloor is ready, install the carpet tack strips:
- Use a small hand saw or specially designed snips to cut carpet tack strips to fit the perimeter of the room.
- Position the strips with the tack points facing the wall. Each tack strip should butt up to each other, end to end.
- Install tack strips so they wrap around door frames. Don’t place tack strips across the openings of the doors, though. You don’t want to step on the sharp points of the tack strips.
- Keep a space equal to about two-thirds the thickness of the carpet between the walls and the tack strips. Use a scrap piece of carpet as a guide.
- Nail the tack strips to the wooden subfloor. If you’re installing carpet over concrete, use masonry tacks or an epoxy adhesive to attach the strips to the floor.
Tip: Tack strips are sometimes called tackless strips because they eliminate the need for using individual carpet tacks to hold carpeting to the floor.
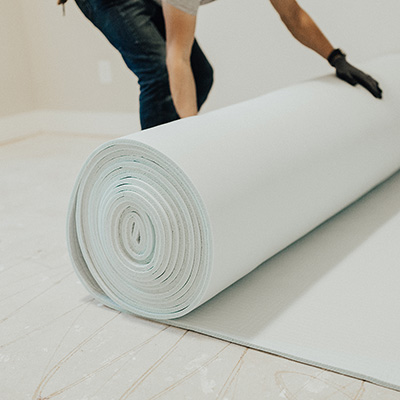
Install Carpet Padding

Carpet padding reduces noise, provides insulation, helps the carpet last longer and adds comfort underfoot. Whenever you install new carpet, you should also install new carpet padding.
Carpet and carpet padding comes in fixed widths. Depending on the measurements of your room, you may have to lay more than one piece of padding or carpet in a room. The places where those pieces meet are called seams.
- Position the carpet pad on the subfloor so that any seams will be at right angles to the seams in the carpet. When you lay the carpet over the pad, its seams should be perpendicular to the seams of the padding.
- Use a carpet trimmer or sharp utility knife to cut the carpet pad to fit the length of the room. The edges of the carpet pad should go up to the edge of the tack strips. The carpet pad shouldn’t be placed over the tack strips.
- Tape neighboring pieces together with 2- to 3-inch masking tape or as directed by the manufacturer. The carpet padding should cover the entire floor you plan to carpet.
- Use a staple hammer-tacker to fasten the carpet pad along the edge of the tack strip.
- Trim excess pad at the edge of the tack strip.
- Staple the carpet pad at the seams, alternating the staples so they aren’t next to each other.
- When installing carpet padding on concrete, follow the manufacturer’s recommendation for carpet adhesive.
Measure & Cut the Carpet

Getting the correct measurements of your space is key to DIY installing carpet.
- Measure the room along the longest wall. Add 6 inches to the measurement.
- Unroll a sufficient amount of carpet. Do this outside, if possible.
- Notch the back of the carpet with a utility knife at the appropriate measurement.
- Roll up the carpet with the backing facing outward. Snap a chalk line across the back of the carpet at the notch you made.
- With the chalk line facing up, place a board underneath the carpet to provide a stable cutting surface.
- Use a straightedge to guide a carpet cutter along the chalk line. Always use a sharp blade.
Lay the Carpet & Secure the Seams

- As you figure out how to put carpet down, unroll the carpet you cut. Place the backing face-down along the wall onto the padding in the room. The carpet seams should be at right angles to the padding seams.
- Keep about 3 inches of extra carpet next to the wall.
- Make relief cuts at corners so the carpet lies flat. Cut from the top using a carpet knife.
- Unroll additional pieces of carpeting into position to cover the floor. Be sure the carpet’s pile goes in the same direction on the pieces.
- Use heat-activated seaming tape where two pieces of carpeting meet.
- Check that the adjoining edges are straight and touching, but not overlapping.
- Lift and bend back one side of the seam. Slip the seam tape halfway underneath the carpet resting on the floor.
- Lower the raised piece of carpet and check that the seam is tight for the entire length.
- Following the tape manufacturer’s guidelines, place a heated seaming iron into the seam and slowly glide it along the seam to activate the tape adhesive.
- Place flat, heavy objects on top of the seam as the glue dries.
Anchor Along the First Wall

- Place a knee kicker about 3 inches from a long wall near a corner.
- Use it to push and hook the carpet into position on the tack strip.
- Move along the wall as you strike the kicker to stretch and pull any wrinkles or slack from the carpet as you latch it to the strips.
After the carpet is attached along the first wall, trim the excess from the edge using a wall carpet trimmer:
- Set the wall trimmer to the thickness of the carpet.
- Keep the tool’s shoe pressed tightly against the carpeting. Keep the carpet tight against the baseboard as you guide it along the wall.
- Press the cut edge under the baseboard using a carpet tucker or stair tool.
Stretch the Carpet

- With the carpet anchored along the first wall, move to the opposite wall and use a carpet stretcher with lever action to stretch the carpet across the floor.
- Place the head of the stretcher several inches from the wall to be attached. Its teeth will grip into the carpet.
- Adjust the extension rods behind the stretcher so that they extend across the floor and back to the first wall.
- Protect the baseboard with a scrap board wrapped in scrap carpet.
- Push the lever down to stretch the carpet taut.
- Reach in front of the power stretcher to hook the carpet onto the tack strip.
- Stretch the carpet in sections, continuing along the wall.
- Trim excess carpet with the wall trimmer. Tuck the edge underneath the baseboard.
- Once the carpet has been anchored to two opposite walls, repeat the procedure to stretch, anchor, cut and tuck the remaining walls.
Install Transition Strips

To finish your carpet installation, place carpet transition strips at thresholds where carpet meets another type of flooring. Use carpet edging to connect two uneven floors.
- Seal the edge of the carpet with latex seam sealer to prevent unraveling.
- Install a binder bar or a transition strip over the edge with a brad nailer.
- Replace any doors, baseboards and trim you may have removed earlier in the project.
Although labor-intensive, putting down carpet is a straightforward process. As you learn how to install carpeting, it gets easier with practice. Installing new carpet can completely change the look of a room and make it more comfortable.
You’ll need some specialized tools to install carpet successfully. Don’t worry if you don’t have everything you need, since The Home Depot offers floor installation equipment rental. If you need carpet in large, oddly
shaped rooms or would just prefer to leave the work to a professional, we also offer carpet installation services.
Related Products
Related Guides

Leave Your Next Project to Us
Professional Carpet Installation
- Expert Carpet Installers Do It For You
We hand-select licensed and insured carpet contractors in your area who are known for their experience, knowledge, and superior service.
- How Our Carpet Installation Works
To begin your carpet installation journey, explore our extensive range of carpets online or at your local Home Depot store, selecting options that suit your room, lifestyle, and budget. Use your room measurements and chosen carpet to estimate project costs. Next, schedule a visit from a certified carpet pro who will take precise measurements and assess any special installation needs. Finally, review your project quote and financing options before our licensed carpet installers handle the entire carpet replacement process, including removing your old carpet.


