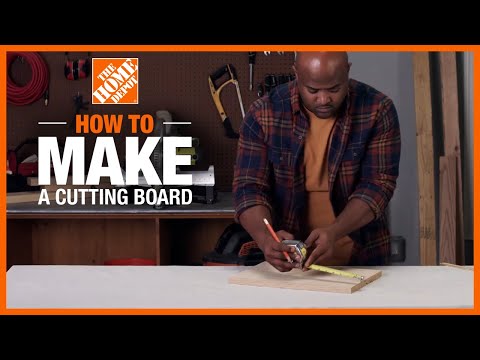
How to Make a Cutting Board
Last updated September 7, 2023
A quality cutting board is a useful tool in any kitchen. The best ones crafted from solid hardwoods have durable chopping surfaces and grooves cut into the board to drain liquids. They are built to last for years of usage.
No kitchen is complete without a cutting board for safe food preparation. This guide will show you how to make a cutting board with woodworking tools and how to keep it clean and conditioned for use.
Difficulty:
Beginner
Duration:
Under 2 hours
Table of Contents
Is a Plastic Cutting Board Safer?
Types of Wood to Use
Types of Cutting Boards
Gather Your Tools
How to Make a Face-Grain Cutting Board
Create a Cutting Board of Your Design
Is a Plastic Cutting Board Safer?

Hardwood is just one of the materials used for making a cutting board. Plastic is a popular cutting board choice in residential and professional kitchens. Its cutting board thickness can vary up to 1 inch. These boards are durable and easy to clean and maintain.
Those who favor the use of plastic cutting boards consider them safer and more sanitary. However, well-crafted surfaces of wood cutting board materials are just as safe when properly cleaned and maintained.
Types of Wood to Use

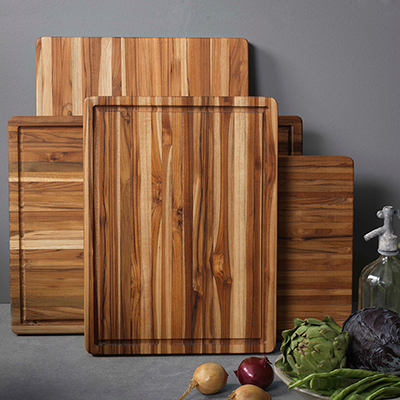
Your DIY cutting board project starts with the type of hardwood that holds up well to knife cuts. It would also be moisture resistant. Dense hardwood lumber with a closed grain like maple, walnut and cherry are among the best cutting board materials.
The choice of wood should be free of warps, have a flat surface and doesn't have any blemishes or excessive knots on the surface. The ideal cutting board thickness should be 1 1/4 to 2 inches.
Types of Cutting Boards

Your DIY cutting board project can be simple or more complex for a visually attractive addition to your kitchen counter.
- Face grain is the least expensive choice when it comes to cutting board wood types. The surface is thinner by design and more likely to warp or crack but is fine for slicing bread and other light usage.
- Edge grain reveals the grain’s vertical pattern of the wood and follows the grain. It is usually made of strips of wood that are lined up and assembled evenly with the edge facing up. The cutting board thickness works best for slicing and dicing.
- End grain cutting boards get their name from the ends of the wood that face up. They are built from quality cutting board wood types like birch and oak. If you know how to make an end grain cutting board, it takes more time to create this checkerboard pattern. This kind of cutting board comes with a higher price and is considered the best option for durability.
Gather Your Tools

You will need these tools to get a start on your cutting board project. You will use power tools for this project, so make sure you wear eye protection.
- 1” x 12” hardwood board
- Tape measure
- Pencil
- Hand saw
- Planer
- Miter saw
- Jigsaw
- Clamps
- Sandpaper, 220 grit
- Eye and ear protection
- Power drill with drill bit set
- Router with bit set
- Drop cloth
- Food grade mineral oil
- Leather strip for handle
How to Make a Face-Grain Cutting Board

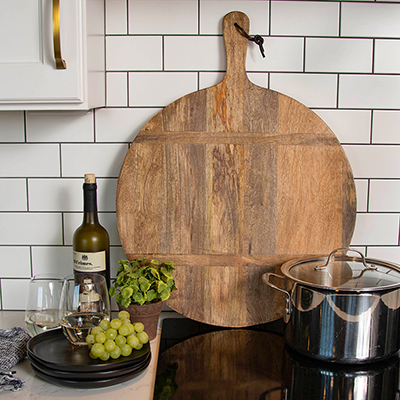
Here’s how to make a cutting board from a panel of edge-grain hardwood with a 1-inch cutting board thickness. When it is finished you can hang your DIY cutting board when it is not in use:
- Using a tape measure, mark the 1- x 12-inch hardwood board at 16 inches. Draw a line with a pencil.
- Cut wood on the line using a circular saw. Make sure to use clamps to secure the board in place as you cut. The final board dimensions should be 16 x 12 x 1 inches.
- Measure and mark 1 1/2 inches in one of the corners, making a plus sign.
- Use a power drill with a 5/8 inch drill bit to drill a hole through the wood plank at the mark.
- Thread the leather strip through the hole and tie off the ends.
Create a Cutting Board of Your Design

You’ll need a stencil to create more intricate cutting board patterns for your wood plank cutting board. You can purchase a stencil of cutting board patterns or design one of your own. Here’s how to make a cutting board in the design that you want:
- Use a pencil to trace the stencil design on the cutting board.
- Clamp the cutting board in place.
- Using a jigsaw, follow the traced line of the cutting board patterns on the board.
Cut a Drip Groove

Your cutting board should have a groove along the sides to collect liquids. This requires building a frame to guide the router you will use to cut the groove. Wear ear protection in addition to safety eyewear. Follow these steps to add the drip groove on your DIY cutting board:
- Use a pencil to mark points 2 inches from each edge of the cutting board. This is where you want the cuts to start and stop. Draw lines to mark the edges. Use a carpenter’s triangle square to mark the corners and connect the lines.
- Clamp the cutting board to a table or work bench to keep it in place.
- Set the router bit to about 3/8 inch depth, less than the cutting board thickness. The edge guide is set to 2 inches from the center of the router bit.
- Turn the router on and set the guide against the cutting board edge. Slowly bring the router down to make the initial plunge cut. Guide the router along the drawn line.
- Rotate the cutting board and repeat the process for each side.
- Wrap a dowel with 180 grit sandpaper and rub the grooves in a back-and-forth motion until smooth.
Sand It Smooth

- Use a sanding sponge or block of 220-grit sandpaper to rub the board and edges smooth on both sides.
- Round the sharp corners with the sanding sponge or block.
- Use sandpaper wrapped around a dowel to sand inside the handle.
- For a professional look, use a router with a round-over or chamfer bit to round the edges.
- Wipe off all the sawdust with a damp cloth.
Seal the Cutting Board

To protect your cutting board, you have to apply oil to seal the surface of the hardwood.
- Squeeze a liberal amount of butcher block wood oil or food-grade mineral oil onto a cloth rag.
- Apply the oil to all sides of the wood by rubbing thoroughly.
- Reapply until the wood stops absorbing the oil.
- Let it dry overnight.
How to Clean a Wood Cutting Board

Try these tips to protect your cutting board and to keep it in sanitary condition:
- Hand wash your hardwood cutting board with a bit of soap and rinse in hot water.
- Do not clean a wood cutting board in your dishwasher.
- Every few weeks sprinkle coarse salt over the surface of the board and rub it with a sliced lemon to get rid of any lingering smells and to sanitize. Then rinse well with hot water.
- Once a month apply a small amount of mineral oil or butcher block oil in the direction of the wood grain.
- Let the oil a moment to soak in for a few minutes.
- Reapply until the wood stops absorbing the oil.
- Wipe off excess oil and dry board overnight.
A well-crafted wood cutting board will be used in your kitchen for years. Use a stencil to create a cutting board that reflects your needs and adds to your kitchen’s decor. When you are ready to begin your project, download the Home Depot Mobile App to get all the supplies you need to make your own cutting board.