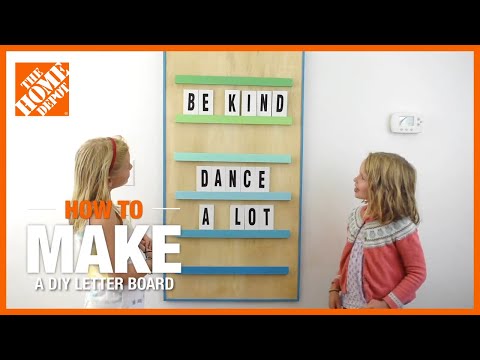
How to Make a DIY Letter Board
Last updated September 7, 2023
Presented by Charlotte Smith of At Charlotte's House.
A DIY Letter Board is a great way to bring fun expression into a home. Making a giant DIY Letter Board is a project the family can do together. This colorful board can be hung up or taken down as easily as a picture frame. All you need are a few tools and materials. Follow the steps below to create this easy, personalized decor.
Safety Tip: To avoid injury, supervise children carefully, especially if they are cutting wood or handling power tools.
Difficulty:
Beginner
Duration:
2-4 hours
Table of Contents
Gather Tools & Supplies
Cut Shelf Brackets
Make the Shelf Brackets
Make Wood Squares & Trim
Paint Shelf Brackets, Squares & Trim
Apply Letters to Squares
Gather Tools & Supplies

The tools you’ll need for this project are a hack saw, miter box, paint brush and sandpaper. Make sure you have wood glue, small clamps and craft paint in fun colors. You’ll hang your board using a picture hanger d-ring and picture wire. You will also need:
- 5/8-inch squared dowel (enough to make six 20-inch pieces)
- 1 1/2-inch wooden lattice (enough to make six 20-inch pieces)
- Wood corner trim (enough to frame a 2-foot x 4-foot)
- One 1-inch x 3-inch project board
- One 2-foot x 4-foot precut, sanded 3/4-inch plywood sheet
- 3-inch vinyl adhesive letters
Cut Shelf Brackets

The first thing to make are the six shelf brackets that will hold the letters. You will be cutting the dowel and lattice pieces to make these shelf brackets.
Using a hack saw, cut both the lattice and dowel into six 20-inch long pieces. Placing the wood into a miter box will make cutting it easier and more accurate.
Tip: Clamp your miter box to your worktable to keep it from sliding around while cutting.
Make the Shelf Brackets

- Place one of the dowel pieces on top of one of the lattice pieces. Make sure to line up the lower edges so they are even and straight.
- Glue the lattice onto the square dowel using wood glue.
- Repeat this step until you have made all six bracket shelves for your letters.
Make Wood Squares & Trim

You will use the project or craft board to make the wood squares to hold the letters for the shelves.
- Place the project board into a miter.
- Using a hacksaw, cut the board into 5-inch pieces.
- Sand the edges of each square so they're smooth and splinter-free.
You will use the wood trim to frame your DIY Letter Board.
- Measure the four outside edges of your plywood.
- Cut the wood trim to match the measure of each side. Use a miter saw or a hack saw to cut 45-degree mitered corners in each piece of trim.
- Try out the trim on the plywood before you paint them. The corners should fit seamlessly together.
Paint Shelf Brackets, Squares & Trim
- Paint the letter squares with white paint so the letters pop.
- Paint the shelf brackets in different shades of latex or acrylic craft paint.
- Paint the wood trim for the frame with latex or craft paint in a complementary color.
Apply Letters to Squares

Once the painted wood squares have completely dried, it’s time to apply the adhesive letters. Make sure your hands are clean and dry. Apply letters one at a time, smoothing as you go. Follow the manufacturer’s guidelines for best results.
Tip: Brush a coat of polyurethane over the letters to keep the edges from lifting or peeling.
Attach Shelves to Letter Board

Attach the shelf brackets to the 2-foot x 4-foot sheet of sanded plywood.
- Start by placing the letter shelves on the plywood board about 6 1/2 inches apart.
- Use a triangle square to make sure the shelf ledges are at a 90-degree angle to the sides of the plywood.
- Mark where each shelf goes with a light pencil mark.
- Glue the brackets in place using wood glue.
Tip: To make letter shelves more secure, nail a brad nail into the brackets from the back of the plywood.
Glue On Painted Trim

- Apply wood glue to the back of each piece of frame trim.
- Attach the trim to the edges of the plywood board.
- Make sure the mitered corners are seamless and straight before gluing them down.
Hang

- Screw two picture-hanging d-rings into the back of the letter board. Screw the d-rings in from the back and into the top shelf bracket on the other side. This will help prevent your screws from poking through on the other side.
- Attach a length of picture wire to each side of the d-rings.
Adjust the length so that it’s loose but tight enough that the wire can't be seen above the letter board.
A DIY Letter Board is a fun project for the entire family. Express yourself in a mudroom, kitchen, playroom or even a den with a DIY Letter Board. With just a few tools, materials and a little time, you can make this cheerful, colorful decor for almost any room in the house. When you’re ready to tackle your next DIY project, The Home Depot delivers online orders when and where you need them.