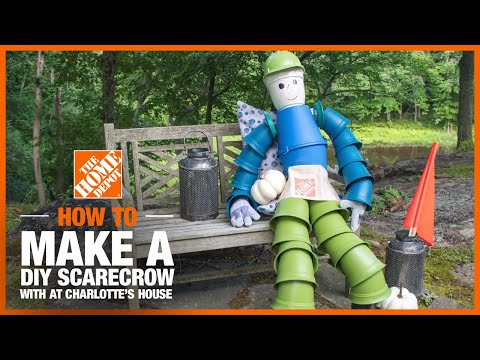
How to Make a Flower Pot Scarecrow
Last updated September 7, 2023
Presented by Charlotte Smith of At Charlotte’s House.
Craft a fall scarecrow with a few common garden items and give your yard some seasonal flair.
Difficulty:
Beginner
Duration:
2-4 hours
Table of Contents
Gather Materials
Drill the Pots
Cut the PVC Pipe
Assemble the Arms and Legs
Craft Hands and Feet
Attach the Feet
Gather Materials

Materials:
- (3) 10-inch plastic pots
- (10) 6-inch plastic pots
- (10) 8-inch plastic pots
- (4) 6-inch saucers
- (4) 4-foot 1/2-inch PVC pipe
- Paracord
- Pair of cement boots
- Pair of utility gloves
- Hard hat
- Small zip ties or wire
- Permanent marker or paint pens
Tools:
- PVC pipe cutter
- Drill
Drill the Pots

- Start by drilling holes into the bottom of all of the small and medium plastic pots as well as the four saucers.
- Use at least a 3/8-inch drill bit to make it easier to thread the paracord through.
Cut the PVC Pipe

Cut the PVC pipe into 4-inch lengths using the PVC pipe cutter.
Tip: With proper supervision, this is easy for the kids to use independently.
Assemble the Arms and Legs

Once you have all the PVC pipe pieces cut, it’s time to assemble the arms and the legs of the scarecrow.
- Cut four lengths of paracord at least 6 feet long. Add some painters tape to the end of the paracord to make it easier to thread it through the holes in the pots.
- String the cord up through the inside of each pot and then through one of the 4-inch PVC lengths.
- Repeat until you have threaded four PVC pipe pieces and five pots. End with a pot, not a PVC pipe.
- Continue in the same manner with the remaining five 6-inch pots and then the ten 8-inch pots.
- Finish with four strings of pots: two lengths of 6-inch pots and two lengths of 8-inch pots.
Craft Hands and Feet

Grab some newspaper or paper towels and stuff the boots and the utility gloves.
Attach the Feet

- Start with the two lengths of 8-inch pots. Tie each end of the paracord around each boot. This project uses cement boots from The Home Depot. They have two loops at the top that make this step really easy.
- Pull the paracord tight from the opposite end of the five pots until the top of the boot is nestled inside the bottom pot.
Attach the Legs

- String each “leg” through each of the saucers.
- Bring the two paracords from each leg together and string them both through the bottom of one of the 10-inch pots.
- Before you add the second 10-inch pot, turn it upside down and drill two holes on opposite sides from each other about 2 inches below the top (technically the bottom of the pot, but it’s upside down).
Attach the Hands

- Attach the utility gloves to each “arm” of the scarecrow.
- Tie each end of paracord around the utility glove and pull it tight through all the 6-inch pots.
Attach the Arms and Torso

- Add a saucer to the end of each “arm” and string each paracord through the two holes you’ve drilled in the sides of the 10-inch pot.
- String the paracord up through the top of the 10-inch inverted pot.
- Take the two lengths of paracord from the legs of the scarecrow and pull them up through the 10-inch pot.
- Tie off the arms. Pull them tight and tie them in a knot around the two paracords from the legs.
- With zip ties or wire, connect the two 10-inch pots to make the torso.
- Some pots may already have holes along the rim, but you may have to drill small holes in order to connect the two pots.
Draw a Face

- Decorate the last 10-inch pot with permanent marker to give it a face.
- Spray paint the hard hat to give it a little color.
- Drilling a hole in the top of the hard hat will make it easier to assemble.
Attach the Head

- String the remaining two paracords up through the pot with the face and then up through the hard hat.
- Hold the two paracords and lift the scarecrow up into the air to make sure all the pieces are pulled together without too much slack in the chord.
- Tie a knot at the top of the hard hat and enjoy!
Decorate with Your New Scarecrow Friend

Kids love seeing how all the PVC and plastic pot patterns come together to make a scarecrow!
Charlotte Smith shares her chaotic and color-loving adventures in DIY and design on her blog, At Charlotte’s House. Charlotte writes about fixing up her 1850’s historic home, her five small children, and bringing flea market and vintage decor into a modern home. Her design style is fun, personal, and… sturdy!
Ready to start your project? The Home Depot delivers online orders where and when you need them.