How to Replace a Power Cord Plug
Last updated April 10, 2025
Power cord plugs and power cords may wear out or become damaged over the life of your appliances. Changing an electrical cord plug is a fix you can make yourself. Repairing the plug on an electrical cord can assure your device works safely and successfully.
There are many different types of electrical outlets and plugs used worldwide; this information covers 110-120v plugs and outlets in the United States. This guide will walk you through replacing a non-polarized two-prong plug. You’ll also learn how to replace polarized plugs such as terminal screw plugs and three-prong plugs.
Difficulty:
Beginner
Duration:
Under 2 hours
Table of Contents
Types of Electrical Plugs
Polarized and Non-Polarized Plugs
Vintage Plugs and Fabric Electrical Cords
Assess the Damage
Prepare the Replacement Plug
Cut Off the Old Plug
Types of Electrical Plugs

Unplug the device before working on it. If the plug is damaged but still plugged into an outlet, turn off power at the breaker before unplugging.
You can figure out what type of plug you have by looking at the prongs and electrical information printed on it.
There are three major types of replacement plugs: self-connecting, terminal screw and three-prong.
Self-connecting plugs snap on easily and are seen on appliances like lamps.
- These standard two-prong plugs aren’t usually polarized.
- They're the easiest plugs to replace.
- The installation is straightforward even if you use a polarized self-connecting plug.
- These replacement plugs often work by means of metal parts inside the plug that pierce the insulation and hold the wire, all in one step.
Terminal screw type plugs have terminal blocks with screws to securely connect the wires to the prongs.
- These plugs are usually polarized.
- They're more complicated to replace than non-polarized self-connecting plugs.
- If the face of the plug has screws between the plug tines or prongs, it’s a terminal screw plug.
Three-prong plugs are used for appliances that pull more power than minor ones do or require a grounded connection.
- Three-prong plugs are polarized.
- These plugs have a big prong, a smaller one and a rounded grounding prong.
- The round prong is for safety purposes, so never remove or change it to fit a different outlet.
Polarized and Non-Polarized Plugs

Polarized plugs have one prong blade wider than the other.
- They’re the type of plug that only fits into the outlet one way.
- Many modern appliances have polarized plugs.
Non-polarized plugs have two prong blades that are the same size.
- You won’t have to flip these plugs over to get them to fit the outlet.
- Many self-connecting plugs are non-polarized, but not all of them.
Polarized plugs show you which side is the hot side of the circuit and which is the neutral.
- The hot side, the narrow tine or blade, conducts the electricity.
- The neutral is the return wire, and the wide tine carries the current back to the electrical panel.
Polarized plugs are safer than non-polarized ones because of possible reversed polarity and an open circuit. If the hot and neutral tines on the plug don’t match the hot and neutral slots on the outlet, electricity could arc out. With modern cords, it’s less of a concern because of better wire insulation. However, with vintage appliances, it's good to be aware of this issue.
Vintage Plugs and Fabric Electrical Cords

Antiques and vintage appliances often have a fabric-covered power cord. On these items, it’s likely best to replace the whole cord instead of just the plug.
Proceed with caution when replacing cloth-covered wires. The insulation in old cloth wiring deteriorates over time. As the insulation breaks down, the fire hazard goes up. Asbestos was used as an insulator in appliances made prior to the 1980s. Cutting into a cloth cord to remove the plug may release those fibers into the air.
Avoid replacing plugs on cloth vintage two-pin power cords for antique heaters or irons. They could contain asbestos and should be replaced by a professional. It may be present in any fabric cord, but the odds are greater for heat-generating appliances.
Modern cloth-covered power cords are designed to appear vintage. If this is the type of power cord you have, it can be repaired with these instructions but you will need a new plug that is designed for use with this type of cord.
Assess the Damage

If your cord is not cloth or fabric, examine it closely. Assess the damage to the plug and cord while the appliance is unplugged.
- If only the plug prongs are bent or snapped, start by replacing the plug.
- If the cord itself is frayed or has exposed wiring, you may need to replace the entire electrical cord. Replacing only the plug while leaving a damaged cord could leave you open to electrical shock.
- If the damage is close to the plug, you may be able to retain the wire by cutting the cord at the damaged spot.
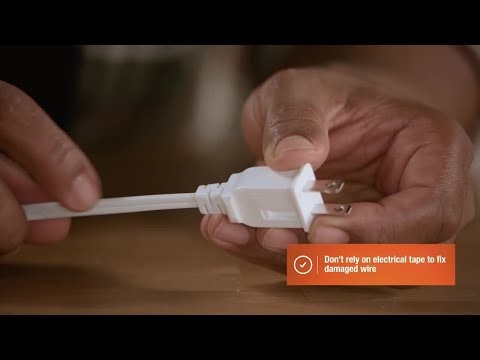
Tip: Do not wrap damaged or exposed wiring in electrical tape and then fix the plug. This could create a fire hazard or the potential for electrical shock.
Prepare the Replacement Plug

Make sure the plug matches the voltage rating and amperage of the wire. The number should be printed on the old and new plugs, so just make sure they match. Don’t replace a three-prong plug with a two-prong plug or vice versa. If you’re replacing a polarized plug, make sure the new plug is polarized too.
Cut Off the Old Plug

Once you’ve determined that the plug is the only damaged area, it’s time to remove it:
Unplug the device before working on it.
If your plug is polarized, mark the side with the wider prong with tape on the cord. Using electrical scissors, wire cutters or a pair of sharp shears, cleanly cut the plug off the end of the power cord. You don’t need to slit the insulation or remove any material or wire right now.
If there is damage to the cord close to the plug, trim those parts off as well. The cord should be smooth and undamaged all the way until the end where the plug goes. You’ll end up with a slightly shorter cord, but it’s best to be safe.
Open the New Plug Cover

Open the new plug housing to fit it onto the cord. A Phillips-head screwdriver usually does the job, but you may need a flat-head one:
- Using a screwdriver, unscrew the plug cover or plug jacket. Depending on the replacement plug, the screws are near the prongs or on the side of the plastic plug cover.
- Set the screws aside so you don’t lose them.
- Pull and wiggle the plug open. You should have two parts.
Insert Cord Through the Plastic Plug Cover

Now it’s time to put the plug back together on the electrical cord. Thread the cut end of the cord through the plastic cover.
If you have a terminal screw plug or a three-prong plug, skip to Step 9.
If you have a self-connecting plug, follow these steps:
- Align either side of the cord with the side of wiring channel marked with a "W."
- Insert cord through the assembly clip and into the wiring channel up to the cord-stop ribs.
- There may be instructions specific to the plug you have chosen. Follow those detailed instructions.
Wrap Wires Around Terminal Screws

Skip this step for a self-connecting plug. If you have a terminal screw plug or a three-prong plug, read on.
For a terminal screw plug:
- Following the groove down the center of the cord, split the wires apart with your fingers or a utility knife.
- Pull the two sides apart to form a Y shape, so you have one side for each terminal.
- The "Y" you create should be only leng enough to allow for installation. It shouldn't extend outside of the plug housing.
- Using wire strippers, expose 3/4 inch of the wires by stripping off insulation from the ends of each side of your Y-shaped cord, as seen above.
- The wire sides will be stranded wire. Twist these strands together, then bend a small hook into each side. You’ll have a Y-shape with bent wire ends.
- If your plug is polarized, make sure the big prong blade matches the side of the wire marked in Step 6. The bigger blade is neutral, and the smaller blade is hot.
- The wire with the ridge on the outside is the return or neutral wire. It goes to the silver-colored screw.
- The hot wire is smooth and carries electrical current. It goes to the brass-colored screw.
- Loosen one screw on the prong and hook the wire around it so the hook goes in the rotation of the screw, which is clockwise. Tighten the screw so the wires snugly wrap beneath it.
- Repeat with the other screw and wire hook.
- Gently guide the wires through the nearby notches so they won’t crimp.
For a three-prong plug:
- The conductor wires in a three-prong cord will the three insulated wires within an insulated jacket.
- Strip the jacket first, then strip the individual wires for attaching to the terminal screws.
- The jacket should only be stripped enough for installation. The plug body needs to clamp to the jacket for proper function.
- Follow the steps for the terminal screw plug, but work with three wires instead of two.
- The black wire, which is hot and carries the electricity, goes to the brass-colored screw.
- The white wire is neutral and goes to the silver-colored screw.
- The green wire goes to the ground screw, which is often green but may be silver-colored.
Assemble the Plug

For a self-connecting plug, press down on the cord to seat it in the wiring channel. Sandwich the plastic pieces together around the cord and press until they snap into place.
For a terminal screw plug or a three-prong plug, slide the prong blades down so they snap into the plastic plug jacket. With the screws you set aside in Step 7, screw together the prong piece and the plastic jacket.
The entire assembly should snap or screw together fully. If it doesn't, back up and try again. It is dangerous to use a replacment plug that hasn't gone together properly.
Plug In Your Appliance

Check your work by plugging in the appliance. It should be functional again. If not, you may want to consult a professional to troubleshoot the issue. They may need to address hidden electrical problems in the appliance.
Once you know how to replace a power cord plug, you can extend the life of your electrical devices. Maintain your home just the way you like it by keeping your appliances running longer.
Need help identifying a tool or material for replacing a power cord plug? Find products fast with image search in The Home Depot Mobile App. Snap a picture of an item you want to buy, and we'll show you similar products.