How to Start Seeds in Peat Pots

Last updated September 7, 2023
Peat pots create quick work of starting seeds for a spring garden. Peat pots make transplanting seeds a snap since they break down in the soil. They’re designed to break down and become part of the soil. This means simple planting and no packaging to throw away or plastic to recycle. Read this guide to learn how to use peat pots for a healthy garden all season.
Table of Contents
What are Peat Pots?
Pick the Right Seeds
Set Up an Indoor Growing Station
Tend Your Seeds
Transplant Your Seedlings
What are Peat Pots?

Peat pots are made of a compostable mix of peat moss and wood. Peat moss is dead, fibrous material that forms when moss and other living material decomposes in peat bogs. Peat pots are used for starting many types of vegetables and flowers. They break down over time, eventually losing their form and becoming part of the soil around the plant. This makes them great for fragile seedlings, such as cucumbers and okra. They help ease the stress of the transplant process for plants with delicate roots. Peat pots also help your garden soil keep moisture around the roots of each plant. They also reduce the chances of transplant shock.
Pick the Right Seeds

Plants that don’t need deep roots or adapt well to shallow root growth thrive in peat pots. They’re also great for plants that are typically difficult to transplant without shock. Below are some of the best plants to start in peat pots:
- Herbs: Peat pots are a great way to start new herb plants. Standard peat pots offer enough room to establish a healthy root system. Most herbs are also easy to transplant when ready for outdoor planting.
- Vegetables: Any vegetables with delicate root systems, such as cucumbers, beans, peas or squash, benefit from peat pots. Avoid potentially damaging their budding root systems by keeping them in the peat pot.
- Flowers: Many flowers take weeks before sprouting. Starting them in peat pots is a great way to get a head start on a spring flower garden. Once they grow into seedlings, transfer them outdoors to encourage root growth.
Set Up an Indoor Growing Station

Before you begin, set up an indoor growing station for your peat pots. Follow these steps to create the healthy seedling environment:
- Look for a warm place in your home. The top of a refrigerator or radiator is a great option. Clear the space of any debris and check that it’s free of dust or grime.
- Use a plastic pot tray or sturdy, flat surface to set up your peat pots. A rimmed baking sheet or plastic tote lid would work well. Line your peat pots up on the surface.
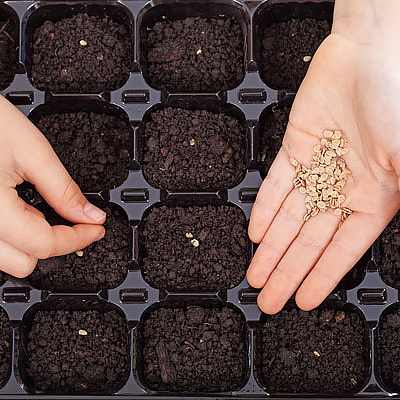
- Fill each peat pot with a soilless potting mix for seedlings
- Place the seeds in each pot and use the eraser end of a pencil to gently push them into the potting mix.
- If your tray has a rim, pour fresh water into the tray and let the potting mix and peat pots soak up the water.
- Gentle sprinkle water over the top of each peat pot.
- Use plastic wrap to create loose-fitting humidity domes over the top of each peat pot. If you're using a growing kit or mini greenhouse, it may come with a plastic dome to cover the plants. Use this dome in place of plastic wrap.
- Place the tray in the warm area you cleared.
Tip: Use a seed starting heat mat if you need extra warmth when starting your seeds.
Tend Your Seeds

Once your seedling station is set up, tend the peat pots until seedlings sprout. Keep your pots constantly moist. Do this by using a plant mister or filling the tray with water a few times a day. The plants will wick up the moisture through their roots. Do not let the pots sit in stagnant water. Keep the plastic domes in place to encourage humidity.
Once you see the second set of leaves on your seedlings, remove the cover and put your tray near a direct light source, such as a sunny window. The second set of leaves is called true leaves and indicates that your plants are established and growing well.
Tip: It is better to fill the tray or use a plant mister multiple times a day than overwatering. Because peat pots are compostable, sitting in too much water can break them down before your seedlings are ready.
Transplant Your Seedlings

When seedlings are mature and the danger of frost is nearly past, they’re ready for your garden. Loosen the pot base by gently squeezing it to make it easier for the roots to break through. Using a razor or utility knife make shallow cuts around the bottom of the pot before transplanting. This creates an easy opening for growing roots to penetrate and extend into the soil.
Avoid damaging the roots while doing this to prevent transplant shock. Cover the entire peat pot with soil, or tear away the top edges to fit in transplant holes. Your peat pots will dissolve over time and decompose into the garden soil.
Tip: Introduce your seedlings to outdoor temperatures before transplanting by finding a sunny space to set them in their tray a day or two before transferring them to the ground.
Starting seeds in peat pots is a natural way to make a fresh garden start. If you’re looking for an alternative to plastic pots, peat pots are a great choice. They work well with a variety of plants and make it simple to grow your own seedlings from scratch. Getting an early start on your spring garden lengthens your harvest season. It also gives you more time to enjoy fresh produce and beautiful flowers.
Browse The Home Depot online to find the materials, tools and seeds you need. Home Depot delivers online orders when and where you need them.