DIY Greenhouse

Last updated August 21, 2024

Lauren Peacock recently moved to rural north Georgia to renovate a 1970s A-Frame cabin. Previously a social media manager, Lauren is now focused on homesteading and a small fresh-cut flower farm full time.
A Note From The Home Depot
As Spring arrives and plants flourish, everyone is ready to try their hand at gardening. Follow along as Lauren of A Peacocks Plants shows how to build the perfect home for all your new plants.
Table of Contents
Step 1: Plan & Measure the Space
Step 2: Set Foundation Posts
Step 3: Build the Side Frame & Hang the Beam
Step 4: Build the Front & Back Frame
Step 5: Hang the Joists
Step 6: Install Plastic, Windows & Doors
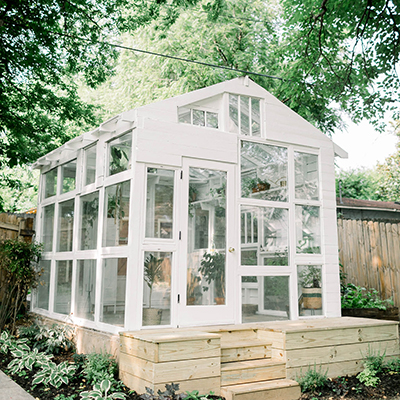
After starting a flower farm last year, I needed a space to store all of my outdoor tools plus a space that I could start tens of thousands of seedlings in before our last frost. We have the perfect spot in our backyard that gets great east-facing sun, as well as a couple of hours of direct early afternoon sun. This structure is also extremely affordable, with the most expensive part being the plastic roofing. If you source and re-purpose used windows, doors and siding, this project doesn’t have to break the bank and will help you on your gardening journey.
Step 1: Plan & Measure the Space
When designing your greenhouse, you should consider where the sun is relative to the structure. Watch your yard throughout the day. Where does the sun travel? If you live in warmer climates, you will want to avoid direct afternoon sun as this will burn your plants, especially if you plan on keeping tropical plants inside your greenhouse.
For my situation, a couple of hours of direct afternoon sun is okay, because my plantings will be transplanted in early spring. If you don’t have any shade coverfrom harsh sunlight, consider adding shade cloths inside the structure to prevent burning plants.
As I’ll be starting thousands of seeds this spring, I also needed a space big enough to house bulbs, flower seedlings as well as veggies for our vegetable garden. I opted for a 10x16 foot greenhouse, but if you’re a hobby gardener, you don’t need a ton of greenhouse space to start vegetable seeds.
You should also consider your weather. We live in an extremely windy and wet area in zone 8b of Georgia. I had a prefab structure in this same location last year that was blown away and destroyed in a small storm. So, I needed this greenhouse to be strong enough to withstand high winds and gusts as well.
I also want to note that this structure is attached to our existing workshop, so we didn’t need to build a fourth wall. You will need to account for this when building your own greenhouse, with changes to the joist length, spanning the full 10-ft. width. You would also need to add three additional posts on the fourth side, with heights at nine feet instead of eight.
Step 2: Set Foundation Posts
Because of the wind in our area, we opted to set posts in concrete, as well as attach the structure to our existing workshop for added stability.
Dig down two feet. Set your 4x4x12 posts in concrete. We used ½ bag of concrete per post. Level and square up each post as you go.

After ensuring that your posts are level, use two 2x4s for each post to support while the concrete cures. Let cure for at least 24 hours.
Step 3: Build the Side Frame & Hang the Beam
Before we begin, I do want to note that we utilized 2x6s rather than 2x4s for the framing. For the purpose of this ‘how to’, I utilize 2x4s as these are more affordable as well as what is normally used for framing. However, I utilized 2x6s as we had leftover wood that was milled on our property, which works out perfectly for small terracotta pots as well as four-inch nursery pots, so the blocking acts as a shelf!

Cut your 4x4 posts to size. Our final structure is eight feet tall on the shorter end, so we cut down to 88 inches. The beams will make up the six inches to reach our total eight-foot height.

Cut two 2x6x10 to 2x6 feet x 90 inches. Set them in between the 4x4s to create your sill.

Cut six of your 2x4s to 94-inch lengths. Attach one to each post at four-foot intervals, with an additional board attached to each side of the center 4x4 post. These boards are offset two inches from the posts to better support the beams. Set two of the 2x4 boards in the middle of the frame three feet away from each post. This should be around 45 inches from each 4x4 post.

Hang the two 2x8x16s on top of the 4x4 posts and 2x4 frame. The beam should sit on the outside edge of the posts and frame.

Now, use three 2x4x8s to make your next cuts to utilize as the blocking. Cut 42-inch lengths for 12 boards total.

Step 4: Build the Front & Back Frame

Cut two 10-foot 2x6s down to 112 inches. Use this as your sill plates for the front and back of the greenhouse. The total width of the front and back should measure 10 feet.

Cut two 2x4x8 down to 94 inches with a 15-degree beveled edge. Attach one to the front 4x4. Repeat for the back side.

We used a repurposed 32x80-inch door. Cut one 2x4 at 91 inches and a second at 91.5 inches, beveling both edges at 15 degrees. Measure from the inside of your post and set the 91-inch board at 34 inches. Then, attach the second longer board to the first to act as your door opening.

Cut one 2x4x10 into three 36-inch boards. Attach at two-foot intervals to the sill plate.

Cut a 2x4 to 78 inches and attach on top of the 2x4 studs. This part of the structure will hold the T1-11 board.

Now, build the frame for the front window. Cut one 2x4 at 48 inches with a 15-degree beveled edge. Make a second 2x4x42 board with a 15-degree beveled edge.

Cut two boards to 2x4x34 inches. These will be used for the header of the door. Cut an additional two boards at 28 inches. These will be the header for the window.

For the back of the greenhouse, cut one 2x4 at 112 inches. Cut four additional pieces down to 34 inches. This will be used to attach the T1-11.

Next, cut one board at 54 inches with a 15-degree beveled edge. Then, cut a second board at 50 inches with a 15-degree beveled edge. These will be used for the window opening. Cut two pieces to 28 inches. These will be used for the header. Attach at the height of the window at 48 inches.

Step 5: Hang the Joists

Cut nine 2x6x10s down to 108 inches. This cut will likely be different for most builds as we utilized the eaves of our existing workshop to attach the joists.

Use 2x6 inch joist hangers to attach the joists to the side of the frame. Use two-foot spacing to hang each joist.

Step 6: Install Plastic, Windows & Doors
Install the plastic, cutting around the windows and doors. Use self-drilling screws with rubber washers to prevent leaks to install the plastic. Then, hang your windows and door. Learn more about installing windows and doors.
Cut down two T1-11 boards to 3-ft. widths. Cut one of these boards to a length of 82 in. This is for the front of the greenhouse. For the back, attach a full 96-inch board as well as the left-over piece from the front. This piece will need to be cut down to 24 inches.
Finish the greenhouse with your choice of paint, stain and molding. Make sure that all openings and gaps are covered and sealed, especially in colder climates as you don’t want freezing drafts entering your greenhouse.
Now it’s time to plant!
This post was created in partnership with The Home Depot. The author may have received compensation for this article and associated images or video, potentially in the form of products and/or services. All expressed opinions and experiences are the author’s own words.