Garage and Yard Spring Refresh

Last updated August 21, 2024

*David, known as PV Plant Guy across social media, is a passionate plant parent, gardener, husband, and dog dad. David's interest in plants started at a young age when he would help his dad care for their vegetable garden in his hometown backyard - fast forward to 2017, and his interest in houseplants really started to pick up speed. Since then, David has grown his personal plant collection to over 100, and shares houseplant tips and tricks across his* Instagram *and* TikTok*. For David, spending time with nature is his ideal form of relaxation and meditation. He currently lives in Neptune Beach, FL, with his husband, three golden retrievers, and over 100 houseplants, of course!*
A Note From The Home Depot
Warmer weather means it’s time for a spring-cleaning refresh for all areas of your home. Read to see how David Dekevich freshened up both his garage and front yard for the new season!
Table of Contents
Garage Clean-Out
Step 1: Create a Plan
Step 2: Remove Everything and Clean
Step 3: Sort and Organize Your Items
Step 4: Create a Designated Area for Each Item
Step 5: Routine Maintenance
Spring is here and it's time to start thinking about getting your yard ready for the warmer weather! I recently moved into a 1975 ranch-style home, so this year will be my first go at spring-cleaning. If you’re like me, you probably have an ongoing list of to-do items for the house and yard that never seems to end. It’s an ongoing process, which is why it’s often referred to as “maintenance!”
I live in Northeast Florida, so there are two key factors that come into play when spring cleaning: first, there are no basements, so the bulk of my storage is in my garage. Second, there are giant Southern Live Oak (Quercus virginiana) trees almost everywhere. They keep their leaves through winter, then each spring, they go through a period of leaf drop where they shed their leaves to make room for new ones. It can be a painstaking process for homeowners!
In preparation for the warmer weather, I spruced up my front yard and cleaned out my garage with help from The Home Depot - combine nature with a little bit of cardio, and I’m in my happy place!
If this is something that is also on your to-do list, check out how The Home Depot made this year’s spring-cleaning process convenient and enjoyable!
Garage Clean-Out
I was overwhelmed by the amount of clutter that’s been sitting in my garage all winter. So much, in fact, that I couldn’t even park one car inside of it! Here is my guide to tackling your disorganized garage mess in 5 easy steps:

Step 1: Create a Plan
Think about what items you need to keep and what can be thrown away or donated. For the items you’d like to keep, think about the most efficient way to store them.
Step 2: Remove Everything and Clean
Take everything out of the garage so you can clean all of the dust that has settled over winter with ease.
Step 3: Sort and Organize Your Items
Now that your garage is clean, sort the items you’d like to keep, donate, and throw away. I was previously using clear storage bins which created a false sense of disorganization as I could see the items inside, so I upgraded to solid colored storage bins [20597836] for a cleaner look.
Step 4: Create a Designated Area for Each Item
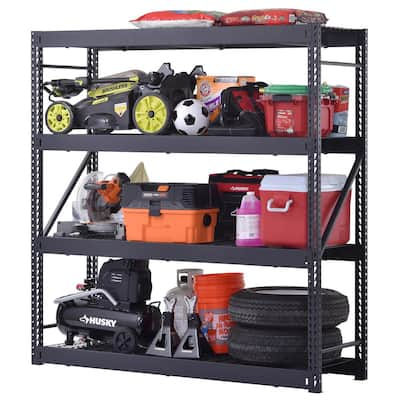
To keep your garage organized, identify a designated area for each item. For example, create a space for gardening equipment, sports equipment, and tools. This will make it easier to find what you need when you need it. I upgraded my storage with a 4-tier Husky Shelf, which was incredibly easy to put together (no screws!). It’s heavy duty and can hold up to 2,500lbs per shelf.

Step 5: Routine Maintenance
Now that your garage is clean and organized, it’s important to maintain it. Make it a habit to put things back where they belong after you use them. Do a quick clean-up each time you finish a project in the garage. This will help keep your garage clean and organized all year round!
Front Yard Facelift
The front yard is the first thing people see when they come to your home or drive by, so it's important to make a good impression. Yard work can often be overwhelming given the amount of manual labor that needs to happen, but that shouldn’t be a worry when you have the right tools for the job! Here are the steps I took to give my front yard a facelift.
Step 1: Cleaning Up Debris
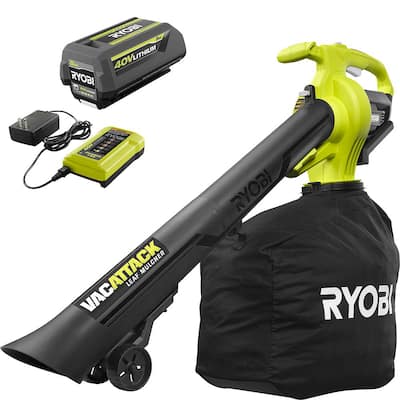
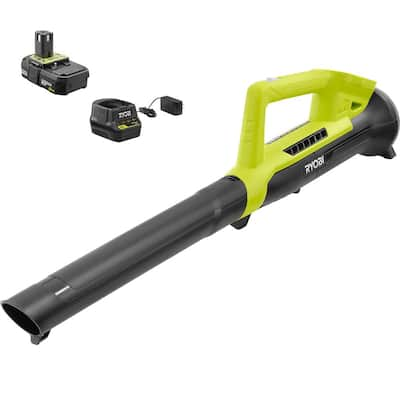
Start by cleaning up any debris that may have accumulated over the winter, such as fallen branches and leaves. I prefer electric lawn equipment because they are compact and easy to use/store. Given all the debris I needed to clean up, the Ryobi ONE+ 90 MPH Leaf Blower/Sweeper and the Ryobi 40V Vac Attack Cordless Leaf Vacuum/Mulcher were my go-to lawn toys! I never had to worry about the battery running out on either tool and they are both light in weight so my arms never got tired.

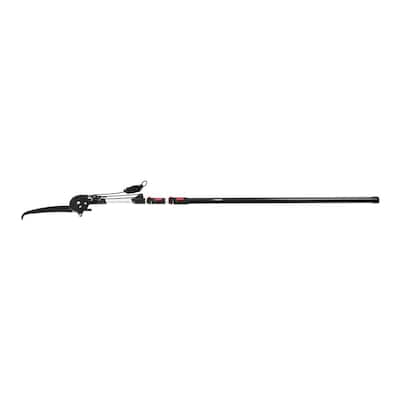
I needed to trim one Live Oak, as its branches were encroaching on a power line, so I used a Husky 16’ Tree Pruner. Trimming trees not only helps them look their best, but it can also prevent potential hazards such as falling branches. I also prepped the beds by spraying an Herbicide to kill the weeds.

Step 2: Prepping for Growing Season
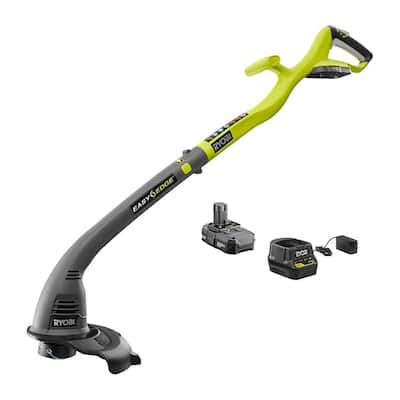
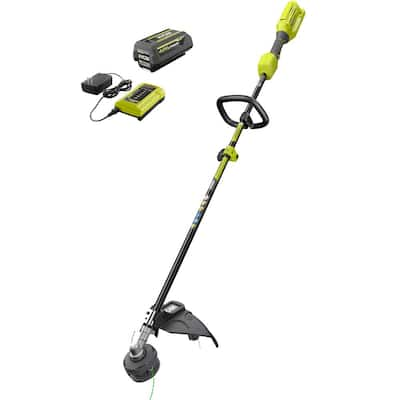
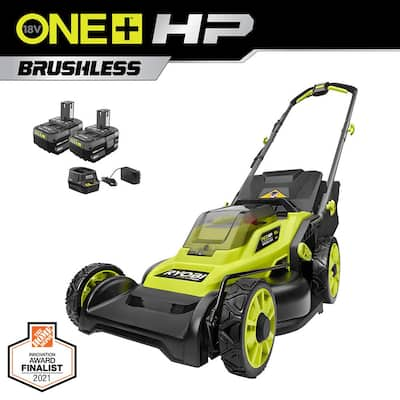
Once your yard is cleaned up, it's important to start preparing it for the growing season. Since I’m in Florida, I need to start mowing my lawn on a weekly basis in late winter. I’ve had my Ryobi mower for over four years and it is still going strong! The newer Ryobio Lawn Mower Models are sleek and have an even longer battery life! In my opinion, the key to having a top tier front yard is to showcase perfectly edged garden beds. I’ve started the process of weekly edging and over the course of the upcoming weeks, the lines between the mulch and lawn will become crisp. I prefer the Ryobi 40V String Trimmer as it cuts through the tough St. Augustine grass runners; however, if you don’t need something as powerful, you can always opt for the Ryobi ONE+ 18V String Trimmer. Clovers have become my lawn’s worst enemy, so I sprayed Southern Lawn Weed Killer Ready-To-Spray two days after I mowed.


Step 3: Add New Plants
Once you’ve got the lawn under control, the last step is to add new plants (if necessary) and a fresh layer of mulch. I added two small pygmy date palms and three small bromeliads to create a tropical feel as guests walk down the sidewalk from the driveway to the front door. When I moved, the garden beds were already layered with pine bark mulch, so instead of adding a different style mulch, I stuck with the bark! Mulch does a great job at retaining moisture and preventing weed growth.


Spring cleaning and yard work can be a daunting task, but with the right tools and products, it can be a breeze. The Home Depot has everything you need to get your front yard in shape and your garage organized. So, grab your gardening tools and storage solutions, and let's get to work!
This post was created in partnership with The Home Depot. The author may have received compensation for this article and associated images or video, potentially in the form of products and/or services. All expressed opinions and experiences are the author’s own words.