How to Make a Faux Tree

Last updated August 21, 2024

Kristen started her creative career as a local event planner. She loves to come up with things that no one else has seen or done. If you can think it, she can design it! You can learn more about her projects, as well as find DIY tutorials, and find creative inspiration for everyday on her blog- A Girl and Her Glitter.
A Note From The Home Depot
Read as Kristen Johnson from A Girl and Her Glitter brings a little bit of the outdoors into her daughter's bedroom with the help of The Home Depot.
Table of Contents
How to Create a Faux Tree
Getting that Tree Texture
Layered Paints
Finished Faux Tree
How to Create a Faux Tree

Let’s create this amazing faux tree using supplies from The Home Depot. This fairy-tale like tree is so realistic that your friends and family are going to have to touch it to believe it. With a lot of imagination and your supplies in hand it’s time to get started.

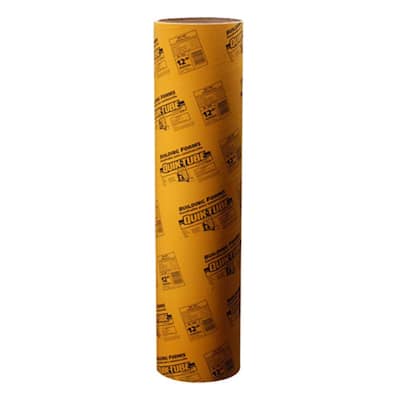
Step 1: First we need to take our concrete form and dry fit the form in your desired spot. These form come in 8 inch, 10 inch and 12 inch. For this thicker tree look, use the 12 inch as shown.

Step 2: You may need to cut your forms to fit your space and you can do so easily with a jig saw. To make this process easier, consider using a battery operated jig saw.

Step 3: Once your form for the trunk of your tree is in place, you may need to connect two forms together to get a realistic height. You can achieve this by using the weatherproof repair tape. After this add in branches from outdoors and drill directly into the studs of your ceiling.
Getting that Tree Texture
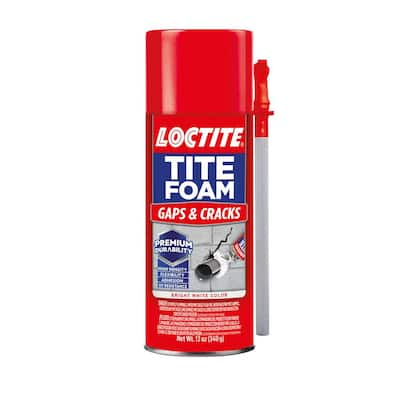
Step 4: Now that the tree base is all set it is time to add on that realistic tree texture. Using the Loctite Gap Spray you will apply this directly onto the concrete form. For best results, work in smaller sections in vertical movements and let dry.

The foam should completely cover the concrete form and be completely set. To make sure that the foam has hardened, press down on a test spot. For best results wait three hours or more.

Step 5: Trim off the higher, round points using a serrated edge while keeping the subtle texture intact. The goal is to get the very tops of the round points to make the foam realistic.

Step 6: Using a wire brush in repeated up and down movements will create grooves that create depth. Use this brush all over the tree to get a unique texture. The grooves in the foam will help the spray paints show their sheens. This depth and lightness will cause the foam to look so real.
Starting with the darkest color then building to the lightest is how to make this dimension.
Layered Paints
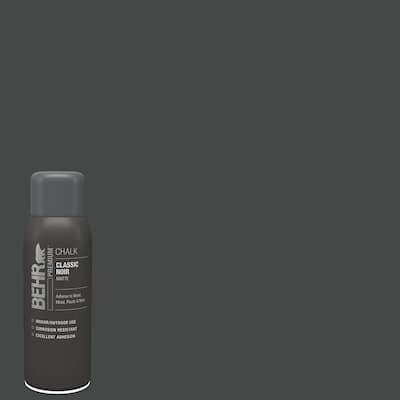
Step 7: Starting with the Chalk (matte) Black Noir, spray this color only into the deepest grooves you have created.

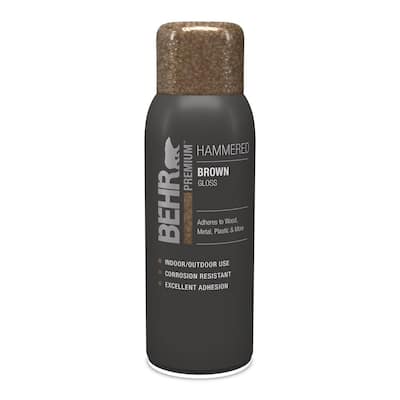
Step 8: After your matte black is applied you will then want to use the Hammered finish Burnished Amber. This time, apply the paint just to the left and right of your black.

Step 9: Continuing with the Hammered finish, grab the Brown shade. With this layer, be sure to spray anywhere you see the white of the foam still exposed. The tree should now have color all over the foam covered trunk.

Step 10: To top this tree off, take your Chalk finish in Linen white and lightly spray from the top down. This light dusting effect of the chalk paint allows for a slight muting of the hammered finishes and looks as if the tree has some age.

Finished Faux Tree
Step 11: When your tree trunk and branches are all finished you can add on any greenery or foliage that you desire. Add on your desired finishes to complete your very own faux tree.

This post was created in partnership with The Home Depot. The author may have received compensation for this article and associated images or video, potentially in the form of products and/or services. All expressed opinions and experiences are the author’s own words.