Moody Laundry Room Makeover

Last updated August 21, 2024

Kristen, creator of Lowery House to Home, shares her passion for tools, DIY and all things home. She inspires others to create the ideal home through easy DIY hacks and creative projects.
A Note From The Home Depot
Give any room new life with products, services and tutorials from The Home Depot. Read along as DIYer Kristen Lowery transforms her bare-bones laundry room from blah to wowza! Then head to The Home Depot for tools, supplies and more to make your dream room makeover a reality.
Table of Contents
Moody Laundry Room Makeover
Before
Cabinet & Countertop Facelift
Tile Wall
Wall Treatment
Shelving
Moody Laundry Room Makeover
My family and I moved into our newly built home two years ago. While the layout of our home was custom-designed, we kept most of the interior builder grade to stay within budget. Our laundry room, specifically, was left mostly bare and lacking functionality or charm. Making over this space has been at the top of my list since moving in hopes of making a daily chore a little more enjoyable.
As a winner of the Orange Tank 2021 competition at Haven Conference, I was so excited to partner with The Home Depot to transform our bare laundry room into a beautiful and functional space!

Before
The space lacked folding space, storage and personality. On the bright side, there was a nice blank canvas to work with and no major demo was required.

Cabinet & Countertop Facelift
The existing cabinets were in great shape and were updated with the power of paint. I used Behr Cabinet & Trim Enamel in the color Echo Park. The color change made an immediate difference. I then spray-painted the existing hardware with Pure Gold metallic spray paint by Rust-Oleum.
I upgraded the current budget-friendly Formica countertops to a beautiful Maple Butcher Block by Swaner Hardwood. I purchased it already, which saved time. This countertop is my favorite part of the space and will serve as a folding area, adding functionality. We decided not to replace the sink, because the old one was never used.

Tile Wall
Heading into this project, I had never tiled before and was most nervous about this phase of the makeover. Deciding on a tile for a wall so large was an important task. I wanted a room with moody colors and settled on Chester Matte Nero Subway Tile by Merola Tile. I loved that it had a handmade look. When ordering the tile, I used The Home Depot’s Tile Calculator to determine the amount needed for my wall and ended up with more than enough.

As a first-time tiler, there were a few things I found helpful: 1) I used The Home Depot’s How-To Guides to research how to tile and grout. The guides were so helpful and made me feel more confident in tackling this skill. 2) I used a pre-mixed thin set
and pre-mixed grout in Charcoal. The pre-mixed items allowed me to take my time and stop and start as needed without worrying about wasting batches.

Wall Treatment
Since the tile wall was going to be all black, I knew I wanted to incorporate color into the room by adding wallpaper. When I first saw this Woodlake Tulipa Sage floral wallpaper
on The Home Depot Mobile App, I immediately stopped scrolling. It is so gorgeous, and I love how many colors are tied into the design. I applied it to the wall with a wallpaper adhesive and found it easy to apply and line the panels up. I finished the bottom half by attaching beadboard paneling
with brad nails.

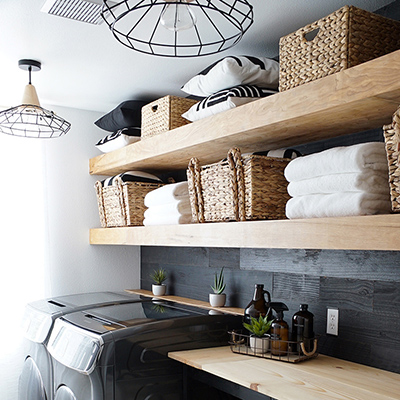
Shelving
To add more storage space and fill the space of the large wall, I added two wall-to-wall shelves to the tile will. I used 8” shelf brackets to
support 1”x 8” select pine boards. I did have to drill into the tile to hang the brackets (talk about nerve wracking!) but using a Carbide drill bit made for tile & glass made it easier than I thought. When the shelves were up, the room was complete, and they were the perfect addition that tied the whole space together and added another bit of functionality.

All that was left to do was style the space! I love the decor options available at The Home Depot. I ordered a set of three 16”x 20” matted gold picture frames and used them around the room. The art inside was DIY that I drew with a permanent marker. Art in a pinch!

The Reveal
After a few weeks of hard work, the laundry room of my dreams was complete! After upgrading the cabinets and the countertop, tiling the back wall, adding wallpaper and shelving, the laundry room is functional and more beautiful than I imagined it would be. The Home Depot made it easy for a DIYer like myself to find and order products with ease and learn new skills. And who knows, maybe now I’ll even enjoy doing the laundry!


This post was created in partnership with The Home Depot. The author may have received compensation for this article and associated images or video, potentially in the form of products and/or services. All expressed opinions and experiences are the author’s own words.