The Muddy Library

Last updated August 21, 2024

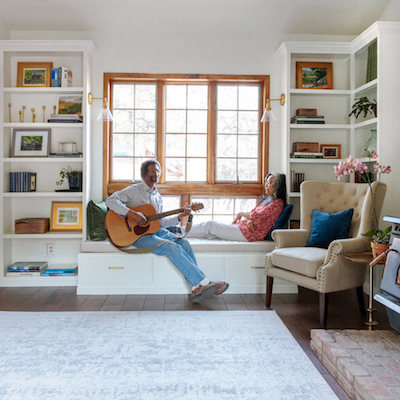
Michael and Cristy Pack of The Iron Victorian are a husband-wife duo from Michigan, making their gorgeous Victorian-style home their own! Through top to bottom custom projects, their goal is to preserve the magic and majesty of their house while adapting it to their needs, and they want to teach you how to do the same.
A Note From The Home Depot
Need an elegant upgrade?
See Michael and Cristy Pack from The Iron Victorian
turn their space into a modern yet sophisticated mudroom library fusion.
Keep reading to see how they partnered with The Home Depot to beautify their room!
Table of Contents
The Muddy Library
The Reason Behind the Muddy Library
The Walls and Floor
Hide the Junk
Faux Stone (Cement) Island/Desk
Bookshelf
The Muddy Library


The Reason Behind the Muddy Library
Living in an 1800s Victorian Mansion, we always want to do the home justice in terms of design, but in order to do that in this house, we often sacrifice functionality. We wanted the design for the Muddy Library to be over the top beautiful but also have every aspect of function for our everyday lives. This is where we came up with the idea to combine a mud room and a library/office or “Muddy Library”. The room is located off the main entry point that we use every day, our backdoor so to speak so you can imagine how this room collects coats, shoes, junk, all the things really!
Our goal was to create a space great for kids’ homework, a home office, place to read, and house all our coats, shoes, hats, gloves, etc. functioning like a mudroom but looking like a library. The trick was to create hiding spaces for all our junk. Let’s face it, the only people who don’t have junk are just good at hiding it! Now the question was, “how can we do all of this and not only fit our 1800s house and keep in line with our personal style?” We often draw inspiration from French design and European formal Gardens. So, we decided to make a mudroom/library and make it look like a formal garden courtyard from France… are you ready?!
The Walls and Floor
First thing was first - we needed to pick the absolute perfect paint color because this room deserves it! We tried a few different gray and white tones and finally found “the one”. It’s the perfect balance between white and gray to not only brighten the room, but to also add more drama than just a simple white. We chose Behr “Soft Secret” (shhhh… the same volume you should have in a library).
It has always been our dream to have a black and white checkerboard patterned floor. Since our original floor could not be saved in this room, we saw this as our big opportunity! We decided to go with white Carrera marble tile and black slate tile.

Hide the Junk
Everyone knows that cabinets are great for hiding junk. The problem was, have you ever seen a cabinet in the middle of a French formal garden? Our guess is probably not. But what you do often see is beautiful French treillage structures, rows of hand-built planters and aged stone statuary scattered throughout. We achieved our storage by using premade unfinished cabinets. They added the functionality we needed right out of the gate. Now for the fun part - we started by removing the doors and adding a flush door made up of plywood and attached three separate hinges attached to 1x4s. From here we continued adding lattice and as much trim as we possibly could, always checking that the door still will function. The more you add, the less it will look like a cabinet and more like a trellis garden structure. We added onlay wreaths as well.
Treillage cabinet tips and tricks:
- The hinges are the most important part of functionally. Keep them on the most outside part of your cabinet, and after you add anything, be sure to make sure the door still functions like it should.
- The more you add, the less it will look like a cabinet.
- Take your cabinets all the way to the ceiling!


Planter boxes are obviously for planting, but by adding a top, can double as a bench or a reading nook. For us, they are particularly great because it means more things can be hidden! Start with a simple box and then add lattice and trim until it becomes like a planter straight from a French garden. We topped our planters off with Lion Medallions to sell the look even more.
Planter box tips and tricks:
- Make a simple box with simple materials, don’t complicate it!
- Add decorative trim
- Elevate your planter with medallions


Faux Stone (Cement) Island/Desk
Let’s start with our holy grail, Ardex Feather Finish. We often use feather finish to create a cement countertop look but we also use it to create faux stone architectural pieces as well. This is exactly what we did with the island. We first used three upper cabinets to create a base for our island. Then we used 2x8s to attach and lift the cabinets to the proper height for an island.
To create some interest, we used 2x6s and a jigsaw to create curved pieces of wood and then attached them. We created a pattern for the curve we wanted and then repeated that pattern multiple times so that we would have curved pieces every 12 inches. We then attached drywall. By scoring and slicing one-inch slats in the drywall it bends to the curve we created. Add trim, lattice, medallions, and an onlay to really make it look like an architectural piece with lots of interest!
Now it’s time to cement the island. We are going to start by making two different mixtures - one for the flat high traffic areas and one for all the small, detailed, hard-to-get areas. For the high traffic areas like the flat top, we are going to follow the exact mixture on the box. This is recommended to make sure the feather finish is at its strongest. This is also the mixture you would use on countertops. The consistency will be a lot like the thickness of soft serve ice cream. This thick mixture will be troweled on as smooth as you can possibly get it.
Once our large areas are covered, we will use a watered-down mixture (about the same consistency as chocolate milk) and then use a paint brush to apply this mixture to make sure all of our detailed pieces are completely covered. Once that is done, we will sand lightly in between each coat only on the top surface. For this island we did three coats total. An optional step is to dark wax some areas to really highlight the details and give an old world stone look. We then sealed the entire island with cement sealer Note: since this island serves as a desk it does not need to be food safe. If you are applying the above steps to kitchen countertops or any food surface, you will want to make sure you use a food grade safe sealer. We pulled two chairs up to the island to create a desk and workspace area.


Bookshelf
Creating your own lattice is easier than you might think! For our bookshelf, we wanted something tall and narrow to take up the whole wall without taking up too much of the room, so we knew that this was going to be something we would have to make from scratch. When you simplify trellis work, it starts with a basic shape. To start, we made two narrow rectangles that go all the way to the ceiling out of wood lath. Once we had your rectangles made, we simply added slats all the way up spaced out evenly out of the lath. Next, we added 1x10s at the same height as our slates to connect each rectangle making the shelving.


If It Does Not Exist - Make it!
Many components of this room are not necessarily purchasable, and if they are, they can be extremely expensive (example: a stone island). If it doesn’t exist, or it is too expensive, you can make it! With the help of The Home Depot and the materials and resources that they provide, we are able to achieve such a gorgeous, custom look for way less when we do these types DIY projects! From big parts of the room such as the tile and cabinets, to a small detail like a lion onlay on a bench planter, The Home Depot has everything we (and you) need!
Do not be afraid to mix concepts for a room, either! Mixing a mudroom and a library/office may not be a conventional approach to designing a room but it works for our family, and we are thrilled at how it all came together with the help of The Home Depot!
This post was created in partnership with The Home Depot. The author may have received compensation for this article and associated images or video, potentially in the form of products and/or services. All expressed opinions and experiences are the author’s own words.