Creating a Kids Playhouse - the DIY Way!

Last updated August 21, 2024

Ashleigh is a YouTube content creator whose journey began in September 2017.
She started this creative outlet to express her love for all things DIY, including furniture refinishing and home decorating. Ashleigh is originally from Columbia, SC, currently living in Georgia with her husband, two baby girls, and two dogs. She enjoys being able to share her creativity to inspire others to create budget-friendly DIY's while incorporating her fun and easy to follow step-by-step instructions. You can see more of her work over on her YT channel Ashleigh Lauren and Instagram @_ashleighlaurn.
A Note From The Home Depot
The warm weather is here and it’s finally time for everyone to get outdoors! With a little help from The Home Depot, DIY blogger Ashleigh Lauren has the details on how you can build a playhouse that’s sure to bring your little ones lots of joy this spring and summer!
Table of Contents
Steps

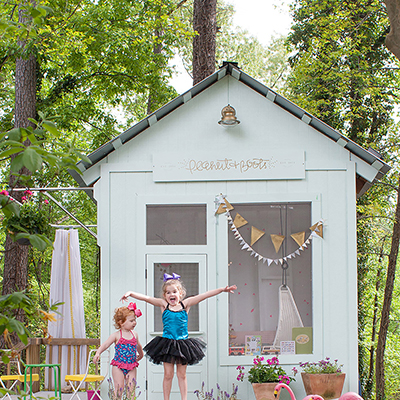
First, let me start by saying how much I enjoyed building this playhouse for my daughter! I'm just going to go ahead and confess that I love getting in there with her sometimes too, and wished I had something like this when I was little! It's a pretty easy build that kids will love, and if you want to know how I made this one, I got you covered.
Steps

To start this playhouse out I began using standard playhouse measurements that I found online, and tweaked them a little to fit my space. I used all
2x3s to complete this project. After I measured out my wood, I began to cut each piece out using my
Ryobi 10” sliding miter saw.

Next, I started to work on the sides. I did a 22.5-degree angle for the side pieces, and the top two were 45 degrees opposing.

After that, I cut my pieces, and I repeated these steps with the (1)
2x3, and I cut those down to 28 7/16”.

After I got all my pieces cut, I put them together to make sure my framing was coming together correctly. For the sides, I cut them down to 51⅛” with a 22.5-degree angle at one end, and for my bottom, I cut it down to 66 ⅜”. The top two pieces measured 37 7/8 ” with opposing 45-degree angles at the top and non-opposing angles at the base.

Here is a shot of what the top to pieces look like when you put them together.

After that, this is how your framing should look for each side.

I started to add pocket hole screws to each piece of wood using my
Kreg jig kit I created them to a depth of 1 ¼, and the collar was the same

I then
began
to measure out my piece to create the bottom of my triangle. I attached all the wood using my
right angle clamp
and
drill. I used
2 ½” pocket screwsto attach.

Next, I began to work on framing the front. I used
2x3s to do this. I cut the sides down to 36 1/16”. I attached each piece using2 ½” pocket screws. I repeated this process on the sides as well.


After I finished attaching my
2x3s for the side, I added more
2x3s to the front to frame it out so that I could add this nice aluminum sheet I spotted at Home Depot.

I then started to sand the whole playhouse using
80 grit sandpaper
to make sure I smoothed it down as best possible and then went over again using
220 grit.

I then added
spar urethane
to my wood before painting since I didn’t use pressure-treated wood. The spar will protect the wood from UV, mold, and harsh weather.

After the
spar urethane
dried, I began to add the outdoor paint I picked up by Glidden called
Cow’s Milk.

The next thing I did was measure out the bottom front of the house. So I would know how much to cut off from my
aluminum sheet.

Once I got the measurement. I cut the sheet down to size using my
tin snips.

After I cut each piece, I used my
Ryobi 18-gauge stapler
to attach them to both sides.

Next, I began to work on the chalkboard portion, which will be the back for my playhouse. I measured the back and then got a white hardboard piece cut down to the size I needed at my local Home Depot, and I added
chalkboard paint
on top. You can use either a
white hardboard
sheet or a sheet of plywood. If using it outside, I would recommend a thick sheet of plywood. You can also keep it as a whiteboard if you choose.

Afterward, I started working on the roof. I added
polycarbonate roofing
to the top. It’s very inexpensive and easy to use. I measured my roof and cut my 8 ft. piece in half, and it fit perfectly on both sides. I did have to trim the excess off of each side.

To attach the piece to the top of the playhouse, I used my
Ryobi drill and
1 ½” pocket screws.

After that, I added more
2x3s to the bottom and also
2x2s on the ends to cover any gaps. I sanded it down using the
Ryobi palm sander
with
80 grit sandpaper.

After I finished sanding I used the same outdoor paint, Glidden’s
Cow’s Milk, to paint the floor.

When I finished painting the floors, I began to paint the
2x3s
that I cut to
attach to the bottom of the windows. The exterior paint color I used was
Sweet Angel. I also cut a
1x6down and painted that same color that I add to the left side of the playhouse.

Next, it’s time to have even more fun by adding all your best personal touches to it that you know your kids will enjoy!

After you have decorated this to your liking, you will have an awesome playhouse for your kids to enjoy! I can personally tell you my daughter is obsessed with this playhouse, and she loves having a cool little hangout.


This post was created in partnership with The Home Depot. The author may have received compensation for this article and associated images or video, potentially in the form of products and/or services. All expressed opinions and experiences are the author’s own words.