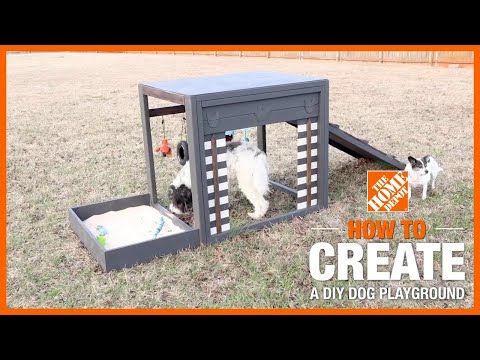
How to Build a Dog Playground
Last updated August 21, 2024

Ashleigh is a YouTube content creator whose journey began in September 2017.
She started this creative outlet to express her love for all things DIY, including furniture refinishing and home decorating. Ashleigh is originally from Columbia, SC, currently living in Georgia with her husband, two baby girls, and two dogs. She enjoys being able to share her creativity to inspire others to create budget-friendly DIY's while incorporating her fun and easy to follow step-by-step instructions. You can see more of her work over on her YT channel Ashleigh Lauren and Instagram @_ashleighlaurn.
A Note From The Home Depot
Everyone needs their own space — even pets! DIY blogger, Ashleigh Lauren has all the steps on how you can create an outdoor pet playground for your furry friends with some help from The Home Depot.
Table of Contents
Steps
Steps

The first step to building this amazing dog playground is gathering all of the wood you will need.

After you have gathered the wood, it’s time to take measurements. I recommend measuring the height and width of your dog first. My lovely model is my dog Bean. He loves to explore and play, so I was super excited to build this playground for him and my other dog Echo.

Next, I started to work on the legs of the playground using a
2x4, and I marked each leg down to 39”.

After that, I cut my pieces with my miter saw, and I repeated these steps with one (1) of the
2x3 pieces, and I cut those down to 28 7/16”.

After I got all my pieces cut, I put them together to make sure my framing was coming together correctly. I cut two (2)
2x4 to 39“ (these will be the legs) and the horizontal pieces, which are the one (1)
2x3, I cut down to 28 7/16”. I also cut a 2x4 to 38 ½” which will run flush vertically to my
2x3s.

The next thing I did was I sanded and rounded out the edges of each piece with my palm sander.

After that, with my drill, I added pocket holes to the inner portions of each board using a hole depth halfway between ¾" and 1 ½" with my collar set to 1 ½".

I then begin to attach all the wood using my
right angle clamp
and
drill. I used
2 ½” pocket screws
to attach, but a
2” pocket screw
would work as well.

Next, I began to work on framing the front. I used
2x2s
to do this. I cut the sides down to 36 1/16” and the top piece I cut down to 34 ¾” . I attached each piece using 2 ½” wood screws.

I began to tackle the ramp next. I first added a
2x3
to the side. I did this so that my ramp wouldn’t be too steep. I used my levelto attach this to the side.

To find my angle, I used myspeed squareI found that it was 30-degrees. I then went to my
miter sawto make a 30-degree bevel cut. After I cut, I added pocket holes to the underside of the wood at the bottom of the angle and attached it to my
2x3.

After I finished attaching my
2x3s
for the ramp, I added another
2x3
to the back using pocket holes.

To create the dig station. I used a
1x6, and I cut that down to the width of the side first, and then the excess piece I cut in half.

I created pocket holes to attach with a ¾” depth and ¾” collar. I then attached this to my side.

After you have completed the frame for the playground, this is how it should look.

Next, I began to work on the front again. I used a sheet of
plywood
that was ⅕” thick 8ft that I got cut down 39"x 41 7/8" at Home Depot (I did end up using my table saw to cut the length down a little more), and I began to create a template to cut out a semi-circle.

To cut the semi-circle out I used myjig saw
and I followed my template carefully around.

Once cut out, I sanded it, and then I attached it to the front using my
wood glue
and
nail gun
with
2" brad nails.

After I finished the front, I started to cut and attach my 1x4s to the
2x3
on the ramp using my nail gun
and wood glue. I also stained the wood with the color dark walnut.

I added
Spar Urethane
to my wood before painting since I didn’t use pressure-treated wood. This will protect the wood from UV, mold, and harsh weather.

I then began to paint using outdoor paint. I used the colors Onyx and Moth Gray by Glidden.

To add some character, I created stripes in the front. I used my
frog tape
to space out my
lines.

I then painted the stripes with the color Moth Gray.

For the ramp, I took some
1x2, and I cut them down to size and added them to my ramp, and stained them the same
dark walnut
[305502000] color.

I attached plywood to the top, cut from the same piece I used for the front at 41 7/8" x 35 3/8", and added it to the top with my nail gun
and wood glue.

Lastly, I added some finishing touches. I attached two stakes to the front and some appliqués. I also added eye bolts to the back to attach toys too.

That’s it! Then you will have a stunning dog house for your pets to play on! As I mentioned previously, I’m so excited that I built this dog playground for my fur babies and even more proud of how this turned out. We tested this out on both my dogs and my friends, and they loved it!


This post was created in partnership with The Home Depot. The author may have received compensation for this article and associated images or video, potentially in the form of products and/or services. All expressed opinions and experiences are the author’s own words.