How to Make a Cat Tree
Last updated August 21, 2024

In 2019, Danielle Guerrero and her husband purchased their very first home. It was a new build so as first-time home buyers and young adults, they settled for the bare minimum - no upgrades. On their move-in day, she was ready to start making their house a home! Not knowing where to start, she did what any girl looking for inspiration did and hopped on Instagram. She began watching videos and how-to's and stumbled upon a post on how to DIY faux shiplap. The couple in the video made it look so easy, so she watched the video religiously over and over and finally convinced her husband that they could do this themselves! They bought the supplies, attempted their first DIY, and have been documenting the process ever since on her blog Our Nest on Powell.
A Note From The Home Depot
Let's spoil our furry friends.
Join Danielle Guerrero of Our Nest on Powell as she builds a cat tree and not just any cat tree but a trendy one!
Table of Contents
Create and Assemble the Structure
Add Decorative Details
Include Comfortable Touches for Your Furry Friend
Hey friends! Let’s build a cat tree and not just any cat tree but a trendy one! First things first, you’re going to want to get your supplies together.
Create and Assemble the Structure

Now that you have your supplies it’s time to get building. I took the ¾ in. plywood and cut it into six pieces. Four measuring at 14 x 24 and two measuring 14 x 12. These cuts will make up the base of the cat tree. I sanded then assembled the pieces to create a box using wood glue and nails but left one of the sides off. The side that was left off is going to be our doorway! You can cut any shape you like but I made mine an arch. Once your shape is cut you can attach the final side. We have a box! From there you’ll take the 2 x 4 and cut it to whatever height you’d like! I did 16 in. I then placed that on top of my box and used the L braces to secure it in place with the 5/8 in. screws.
Add Decorative Details

Next, you’ll want to take 1-2 in. foam and cut it to fit the top of your box. Once you have your shape you can cover that with the fabric of your choice. I’m not great at sewing so I used a glue gun to attach the fabric to the foam and then again to attach the whole thing to the box. Once
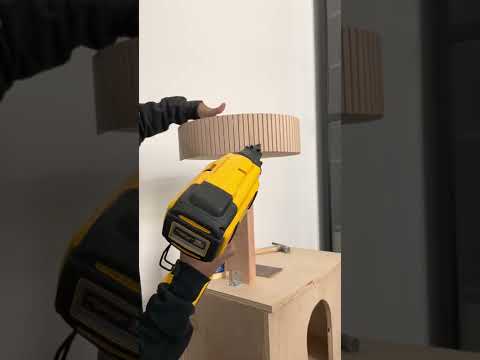
that’s done, you’ll want to take your wood round and secure that to the top of your 2 x 4 with two long screws. Your cat tree should be coming together! Now you’re going to take your rope and wrap it around your 2 x 4 and secure it with hot glue along the way. This will make the perfect scratching post
Include Comfortable Touches for Your Furry Friend

Finally, you’ll want to create some cushions for inside your cat tree and for the perch up top. After that you can either finish off your edges with edge banding or you can add a little spice! I opted for some pole wrap to give the cat tree an elevated look! I cut it to all the proper dimensions to cover the exterior of the base and perch and secured it with wood glue and nails. Now you can stain or seal to your liking and let your cat enjoy their new luxe hideaway!
This post was created in partnership with The Home Depot. The author may have received compensation for this article and associated images or video, potentially in the form of products and/or services. All expressed opinions and experiences are the author’s own words.