Spring Patio Makeover

Last updated August 21, 2024

Nickell or Kell for short is an island girl turned artist sharing her favorite DIY and craft projects on her blog Simply Handmade Studios and her YouTube channel, Simply Handmade.
A Note From The Home Depot
Take spring cleaning outdoors. Nickell Morgan transforms her patio for a spring refresh with the help of The Home Depot.
Table of Contents
Spring Patio Makeover
Planning the Project
The Clean Up & Prep Work
Leveling the Floor
Refinishing the Bar
The Fence Backdrop
Spring Patio Makeover
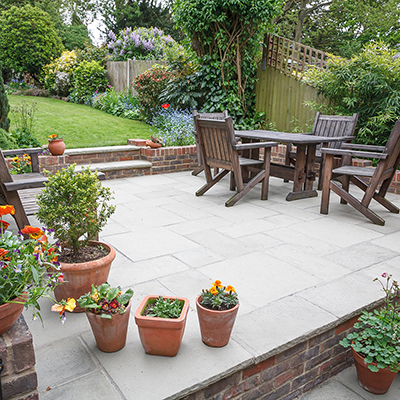
Spring is here and it’s officially time to get the remnants of fall and winter all cleaned up. My downstairs neighbor always wanted to utilize her space but could not get past the unsightly mess in the back. Who could blame her? Just look at this before:


With the help of my Home Depot family (and my husband), we completely overhauled the space to refresh, reorganize, and create an oasis which feels like an extension of my neighbor’s indoor space. I have broken down the process we used to get to the gorgeous after:
Planning the Project


Before picking up a single tool or cleaning the patio, I had a plan for what I wanted it to look like. I knew I wanted a few seating areas, an upgraded bar space, a way to cover the side of the apartment, and to have nicer, even floors. With the help of Home Depot’s Project calculator, I was able to find out how many cases of tiles I needed for the bar, and their app configured itself to the store I was visiting which helped me to find everything I was looking for with ease.
The Clean Up & Prep Work
Tools/Materials:
- 30 second outdoor cleaner
- 1 Gallon Pump sprayer
- Deck brush (or something to scrub the floors)
- Concrete sealant


I used my favorite outdoor cleaner, 30 second cleaner and added it to a pump sprayer and diluted according to the instructions on the label. Once I had the right dilution, I sprayed all over the surface I wanted to clean, which in this case was the floors. I plan to cover the retaining wall later on, so that wasn’t a priority for me.

I washed the cleaner off of the floor and let it dry.


Once the floors were dry, I swept the floors to remove the dust/debris and prepped the floors by filling in all of the cracks with concrete sealant and let it dry.

I called my contractor dad and asked for his advice on leveling the floor. Because I don’t have the ability to rip up the entire floor and start from scratch, I purchased a concrete bonder and fortifier to help strengthen the bond between the old and new concrete. I brushed it along the area that I will be pouring the initial new concrete, where the dip is most apparent.

I followed the instructions and waited for about 30 minutes for the fortifier to become a bit tacky, then added cement to the area that needed the most help as far as leveling goes. We technically should have a longer float, but we evened out the floors as best we could but didn’t stress it too much since we would be adding a self leveling concrete layer on top.

I didn’t want to have such a jagged edge, so I feathered the edges with a trowel to melt the old concrete with the new concrete and let it dry.

Once the concrete was dry, I added self leveling primer to the floor so the self leveling concrete has something to bite onto.

In preparation for the concrete potentially spilling onto the stairs, we added a 1x4 to the top of the stairs with a masonry bit and tapcon screws. In hindsight, we should have used a hammer drill, since it was a struggle drilling into the concrete steps.


We mixed the concrete according to the instructions on the bag
with an egg beater and poured it on the far end of the patio, working our way toward the stairs. I used the all aluminum placer to move around the concrete.

Despite having the 1x4 at the base of the steps, the concrete was seeping through the gaps, so I smoothed out the concrete as best I could and allowed it to dry.
Refinishing the Bar
Tools/Materials:
- ½ inch cement board with edge guard
- 1¼ inch backer on screws
- Drill
- Box cutter
- Pressure treated 2x4
- Mortar
- Grout
- Tiles
- Deck screws
- Sander
- 60, 120, 220 grit sandpaper
- Wood glue
- Outdoor wood stain or sealer
- Self adhesive cement board tape
- Trowel
- Square notch flooring trowel (notch size will depend on the size of the tile)
- Grout sealer
- Tile cutter (type will depend on thickness of tile)
- Spacers (I used 1/8 inch)
- Shims (I used scrap wood)
- Level
- Grout float
- Grouting sponge
- Bucket with water

To refinish the bar, we ensured the face was vertically level, or plumb. We added wood where needed behind the cement boards to achieve this. Notice how the boards are staggered. I did this purposely since 4 corners of the cement boards should not meet (that forms a weak point. Instead, they should meet in a “T” shape.

There were certain angles that needed to be cut on the cement board, and I managed to achieve this by scoring and cutting with a box cutter.

In certain instances, the backer board had some uneven and jagged edges along the cut line and we were able to remedy this by gently tapping down the rough edges with the box cutter.

In order to begin tiling, I added self adhesive cement board tape to the seams and outer corners.

I mortared the seams and outer corners and let it dry.

The next day, I began tiling the bar. First, we made sure the very first row was level. We took a straight edge from one side of the bar to the next, ensured it was level then drew a line that served as a guide on where to add the tiles. We then mortared the cement board, and used the recommended trowel on the mortar (the size guide will be listed on the bag of mortar). Since we are on a slope, we used shims, where necessary to prop up the tile while it set into place.

Once I troweled the entire row, I placed the tiles directly on the mortar and added spacers on the bottom and sides. I was sure to be mindful of the design when placing as well. My husband was in charge of measuring and cutting the tiles, while I focused on tiling the main area. He used a tile cutter to cut down the top and corners of the bar.

The mortar we purchased allowed us to grout the tiles within 3 hours. I mixed the grout according to the instructions on the package and added it in the seams using a grout float. I removed any excess from the tiles using the float.

After a couple of hours, I removed the grout from the tiles using a damp sponge, frequently rinsing off the grout in a bucket of water. The grout haze was still there after a few passes, so I let it dry and removed the rest of the grout with cheesecloth.

When the grout was dry, I added some grout sealer to further protect it.

The existing counter was in pretty good condition, I just needed to clean it up. I sanded the top using 60, 120, and 220 grit sandpaper.

I wanted a lip on the bottom of the bar, so I added some leftover pressure treated 1x2’s I used on a previous project to the front of the bar with deck screws.

Where the new and existing countertop met had a little gap, so I made some DIY wood filler using wood glue and sawdust that was captured while sanding. I filled in the dip on the top of the counter as well as the mitered edge. And sanded it smooth.

Once the sides were in place and sanded, I stained the countertop with an outdoor stain to protect and seal it.
The Fence Backdrop
Tools/Materials:
- (4) 50 lb fast setting concrete mix
- (4) THD buckets
- 4x4 pressure treated lumber
- Spray paint (optional)
- (3) Pressure treated dog ear fence panels
- Deck paint (color I used is SC-102 slate gray)
- Tear Resistant Deck Stain Applicator
- Post level
- Jigsaw
- Deck screws
- Drill

I wanted to hide the retaining wall because let’s face it- it’s not pretty. I needed a renter friendly way to do this, so I decided to add fast setting cement to a bucket with pressure treated 4x4 cut down to 6-feet (same size as the fences). I mixed roughly 2 quarts of water and used the entire bag of cement in the bucket, gradually adding water and cement until I got a good consistency. I also took note of how the posts will be positioned. I put them all toward one end of the bucket, so when placed near the wall, it’s as close to the retaining wall as possible without the cement getting in the way.

While mixing the cement around the post, it’s important that it remain level.


The posts were being added on either end of the fence panels, so to account for the cement I cut out a little over 1 panel on each end. This caused the 1x2 support on the back of one of the panels to fall off, but we will address this later on.

For the corner post, we opted to add scrap 1x2 pieces of wood on either side, so we can add the panels and screw in on the face of the panels.


Now that we have cut and prepped all of the panels, we added a 1x2 support on the back of the panel that fell off when cutting with a jigsaw.

We lined up the fences to the posts and screwed into the post from the face of the the top, middle, and bottom of the fence panel.

Once the fence was put into place, I painted it with a tear resistant pad in the color slate by BEHR.

When I finished painting the fence, I opted to spray paint the cement base with BEHR matte black spray paint to blend it in.
Adding the Faux Vines
Tools/Materials:
- Faux vines
- Hammer drill
- ¼ inch cable clamps
- Drill
- Backer on screws (leftover from the bar)

I wanted to cover the stucco of the building and with the landlord’s permission, I was able to drill some holes into the side of the building with a hammer drill. There was nothing to zip tie the ivy panels to, so this was the best option.

We added cable clamps to the loops on the vine panel and screwed in backer board screws that were left over from the bar. We did this to the entire wall to be able to hang all the vines.
Finishing Touches
Tools/materials:
- Porch and Patio Paint (black and white mixed)
- Smooth/Semi smooth nape roller
- Roller extension
- Brush
Furniture/Decor Links:

When I was all done with updating the space, I mixed some black and white porch and patio paint I had left over from a previous project and painted the floors a light gray and let it dry overnight.

I purchased all of what you see here from The Home Depot. The bar stools, the herb station, the bistro tables, glassware, rug, faux candle, lights, and plants - all from the Home Depot!

The Home Depot is truly your one stop shop to liven up your outdoor space in preparation for the spring! I had a wonderful time creating this oasis for my neighbor to enjoy.


THD After Shots photo credit: Amanda Domenech
This post was created in partnership with The Home Depot. The author may have received compensation for this article and associated images or video, potentially in the form of products and/or services. All expressed opinions and experiences are the author’s own words.